
Mail Server
If you deploy a Mail Server for the first time, Recommend clicking to view:
Mail Server menu
| Mail Marketing | Mail Domain | Mailboxes | Other Settings |
|---|
Mail Marketing
Overview
Mail Marketing --> Overview

Marketing Task
Mail Marketing --> Marketing Task
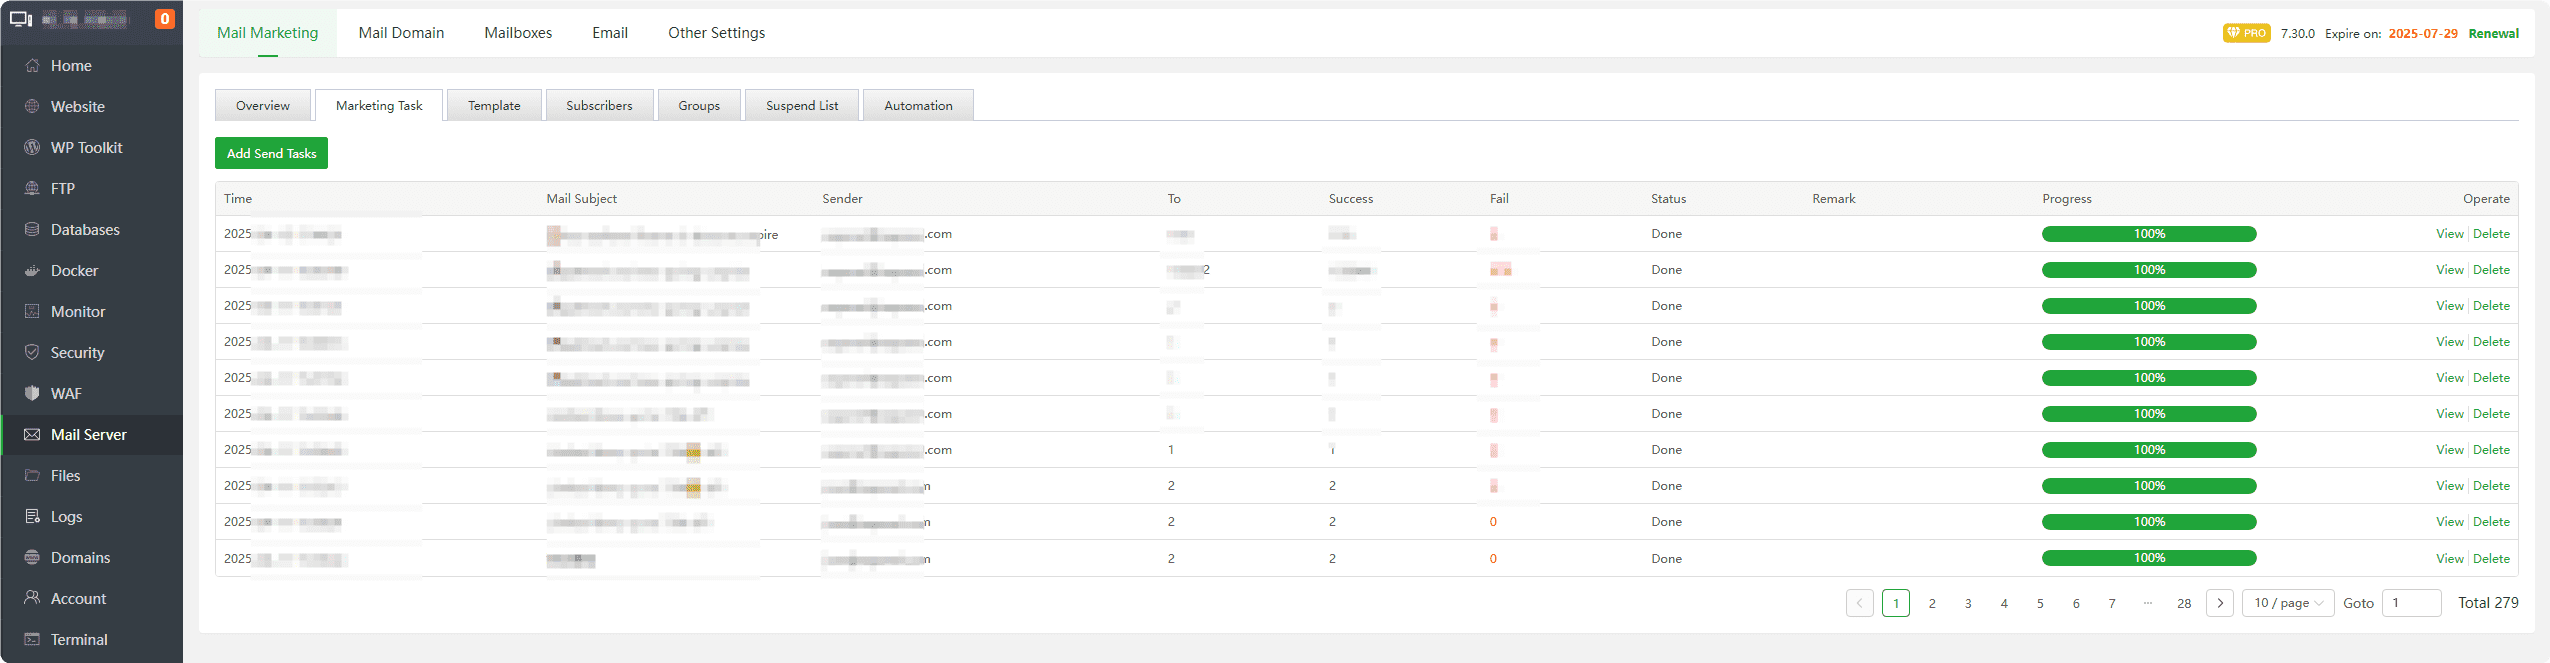
Add Send Tasks: Use email content templates to send bulk emails.
Time : Display the time when the task was added
Mail Subject : Display the
email subjectof the emailSender : Display the
email addressfrom which the email issentTo : Display the
number of recipientsSuccess : Display the number of
successfully sent emailsFail : Displays the number of emails that
failedto be sent. Click to view thedetailed informationsent.Status : Task status:
Pending,Done.Edit : The task is in
Pendingstatus and can beedited.Send : The task is in
Pendingstatus and can besent.Remark: Display the notes for this task.
View : The task is in
Donestatus, Can view thedetailsof the task.Error logs : The task is in the
Donestate, and anerror messageindicating that the email failed to be sent is displayed.Delete : delete task
Add Send Tasks
Mail Marketing --> Marketing Task --> Add Send Tasks
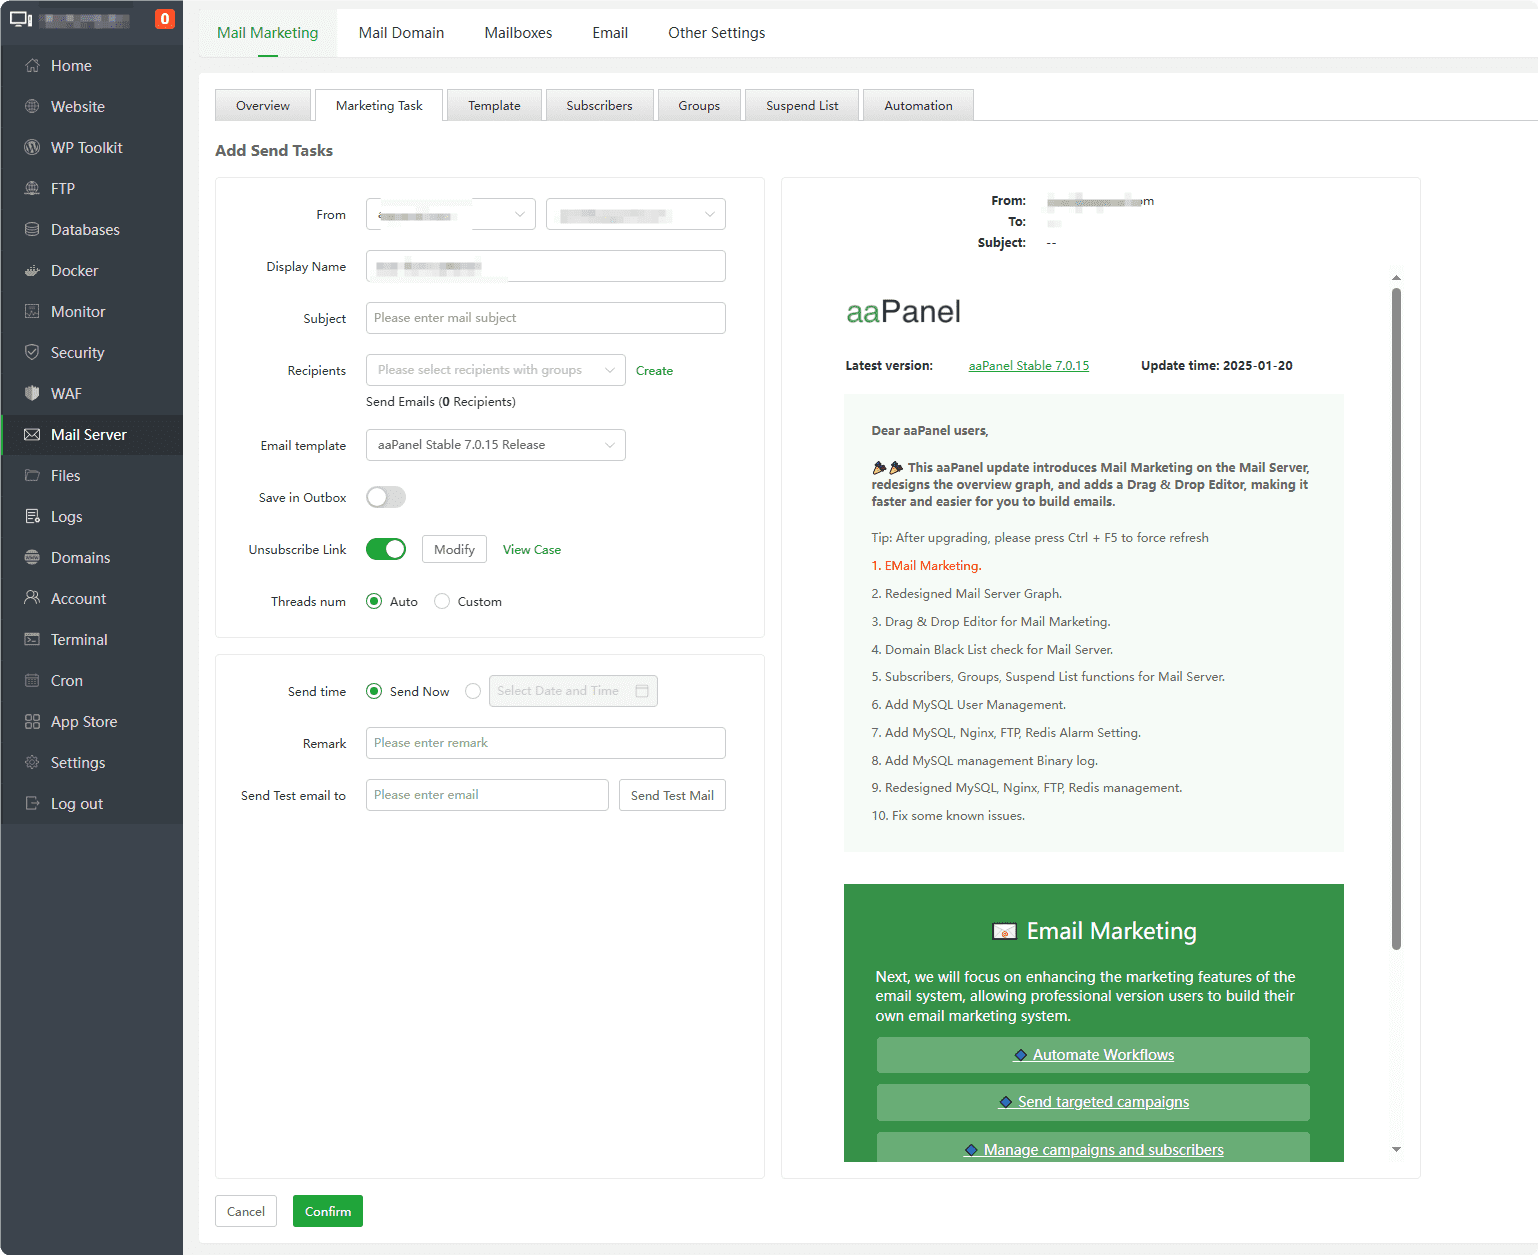
From : Select the
email address to sendthe email toDisplay Name: The name displayed for the sender.
Subject: The title displayed in the email.
Recipients: Select the
group of email subscribersto send to; Click Create to upload a new subscriber group.Email template: Select the
email content templateto be sent, which needs to be created in Template first.Save in Outbox: Whether to save in the
Outbox.Unsubscribe Link: Add an unsubscribe link. The recipient clicks the
unsubscribe linkto opt-out from the email, which will be recorded asUnsubscribe.Threads num: Automatically set the number of threads based on the number of CPU cores or manually set the number of threads for sending emails.
Send time: Choose the time to send.
Remark: Add a note for this task.
Send Test email to: Enter the recipient's email to send a
test emailand check the effect.
Template
Mail Marketing --> Template
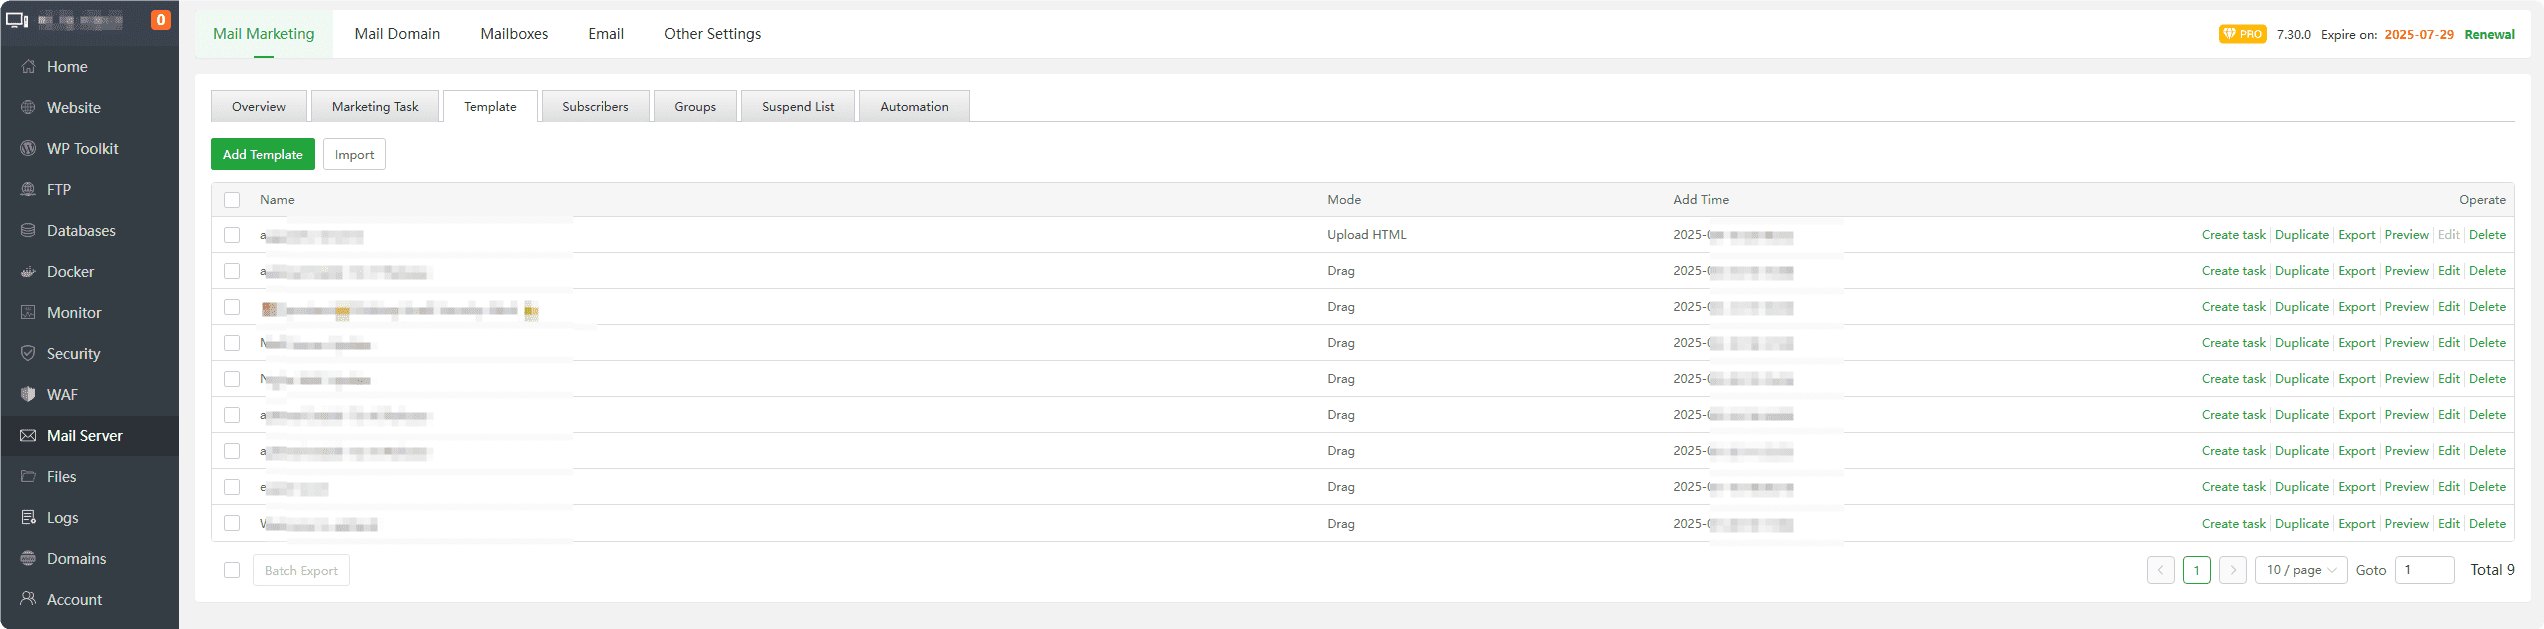
Add Template: Add
email content template, which can later be used to create tasks for sending emails through Marketing Task.Import:
Upload templatesexported from aaPanelName: The name of the email content template.
Add Time: The time the email content template was added.
Create task: Create a Marketing Task using the specified email content template to
send emails.Duplicate: Duplicate the email content template.
Export: Export the email content template.
Preview: View the email content template.
Edit: Modify the email content template.
Delete: Remove the email content template. Once deleted, it cannot be restored, please proceed with caution.
Add Template / Edit
Mail Marketing --> Template --> Add Template
Mail Marketing --> Template --> Edit
Create an email content template based on your needs, and use Marketing Task to add a task for sending emails with it.
- Drag :
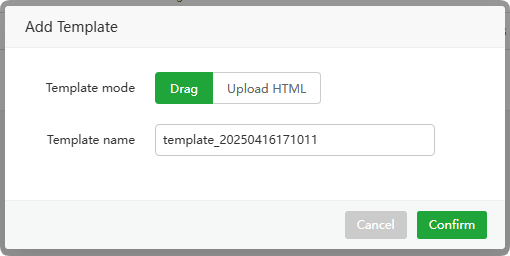
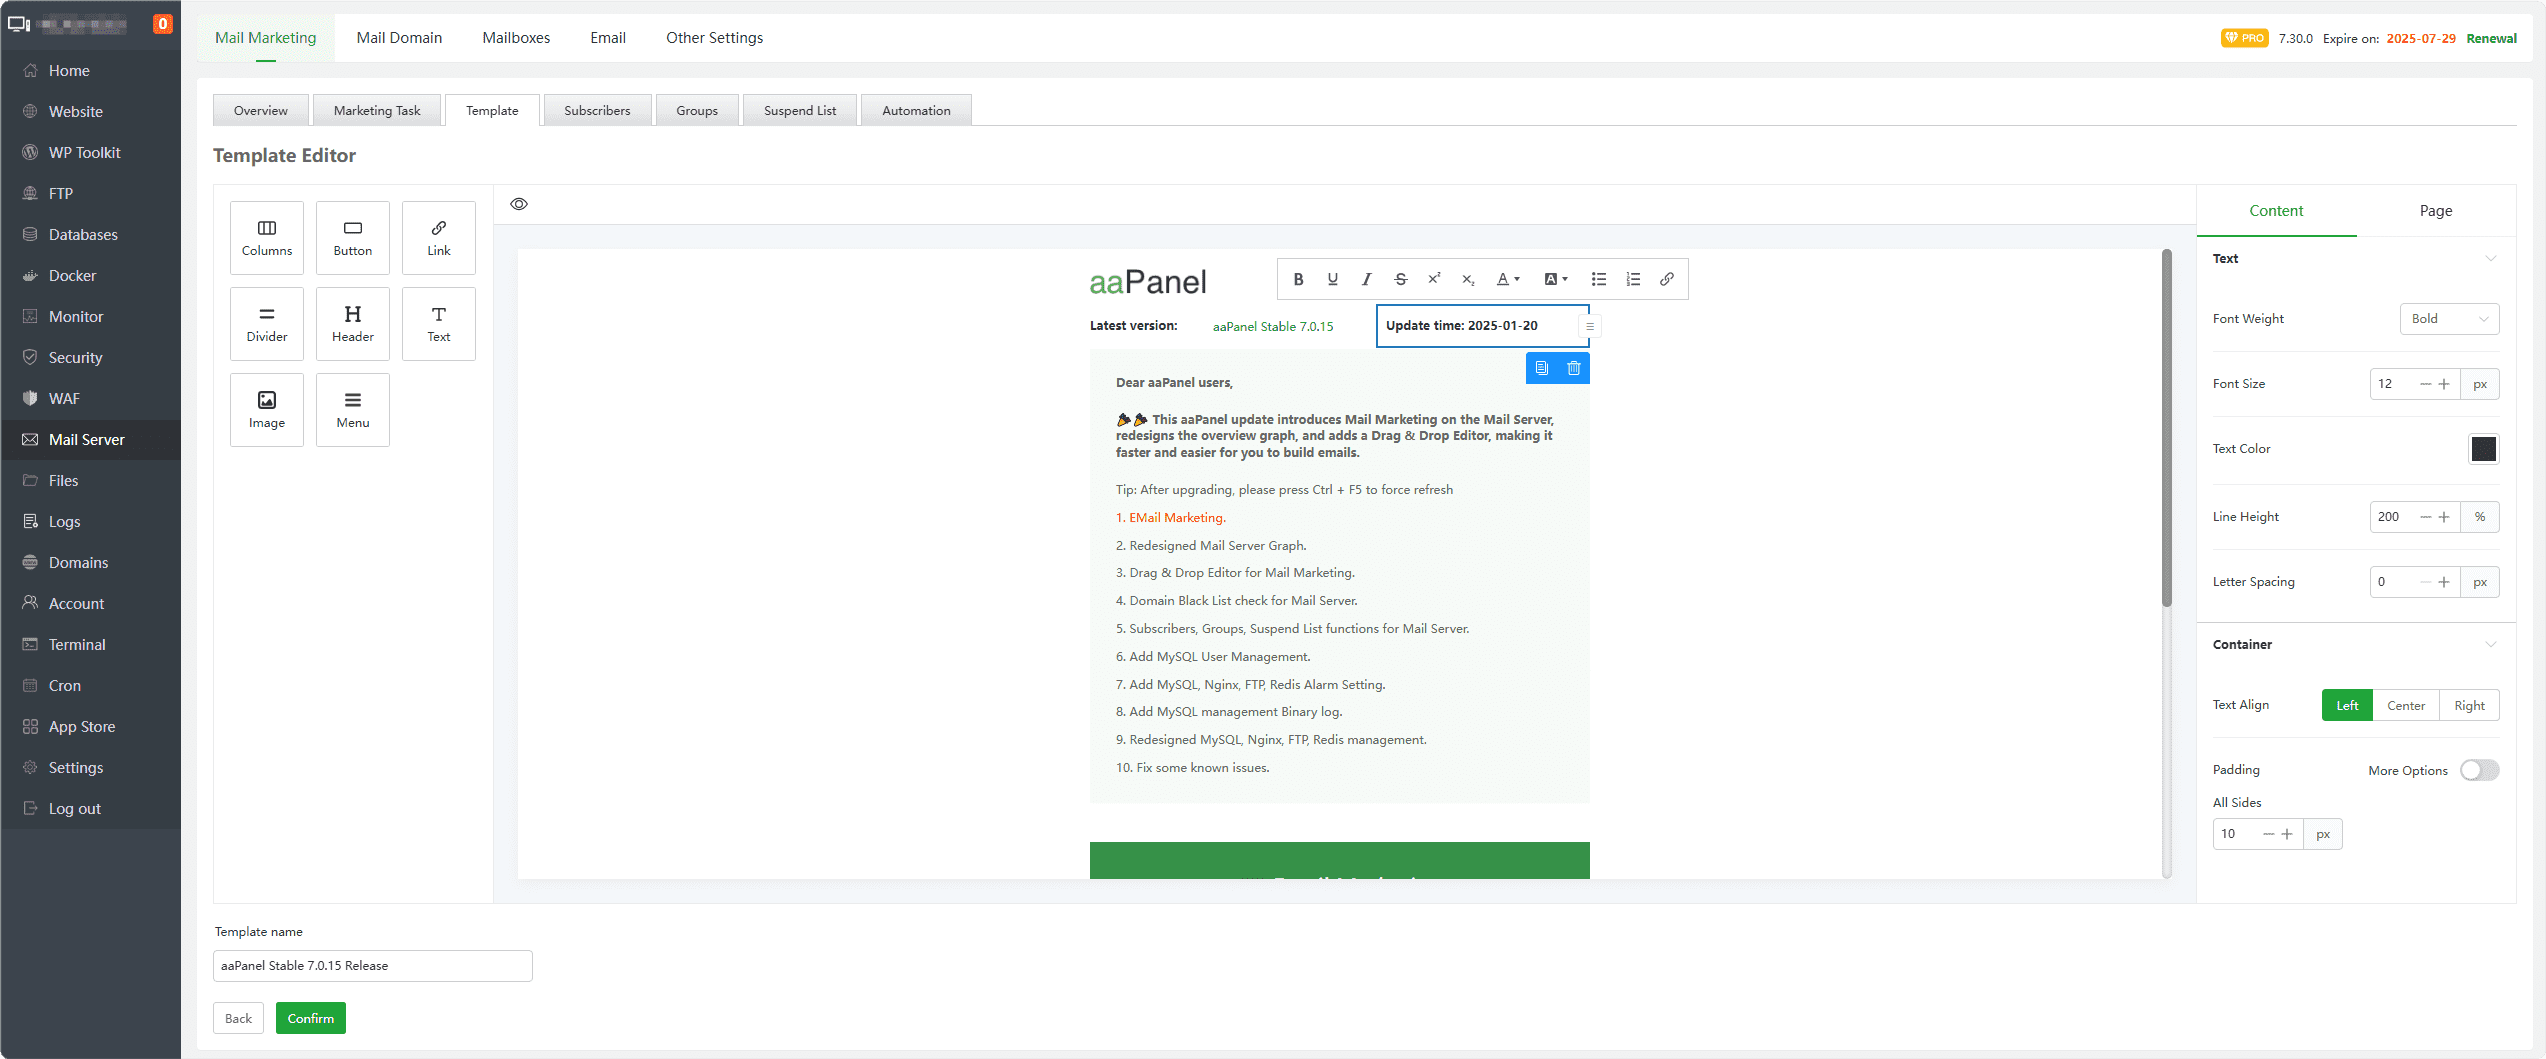
- Upload HTML :

Subscribers
Mail Marketing --> Subscribers
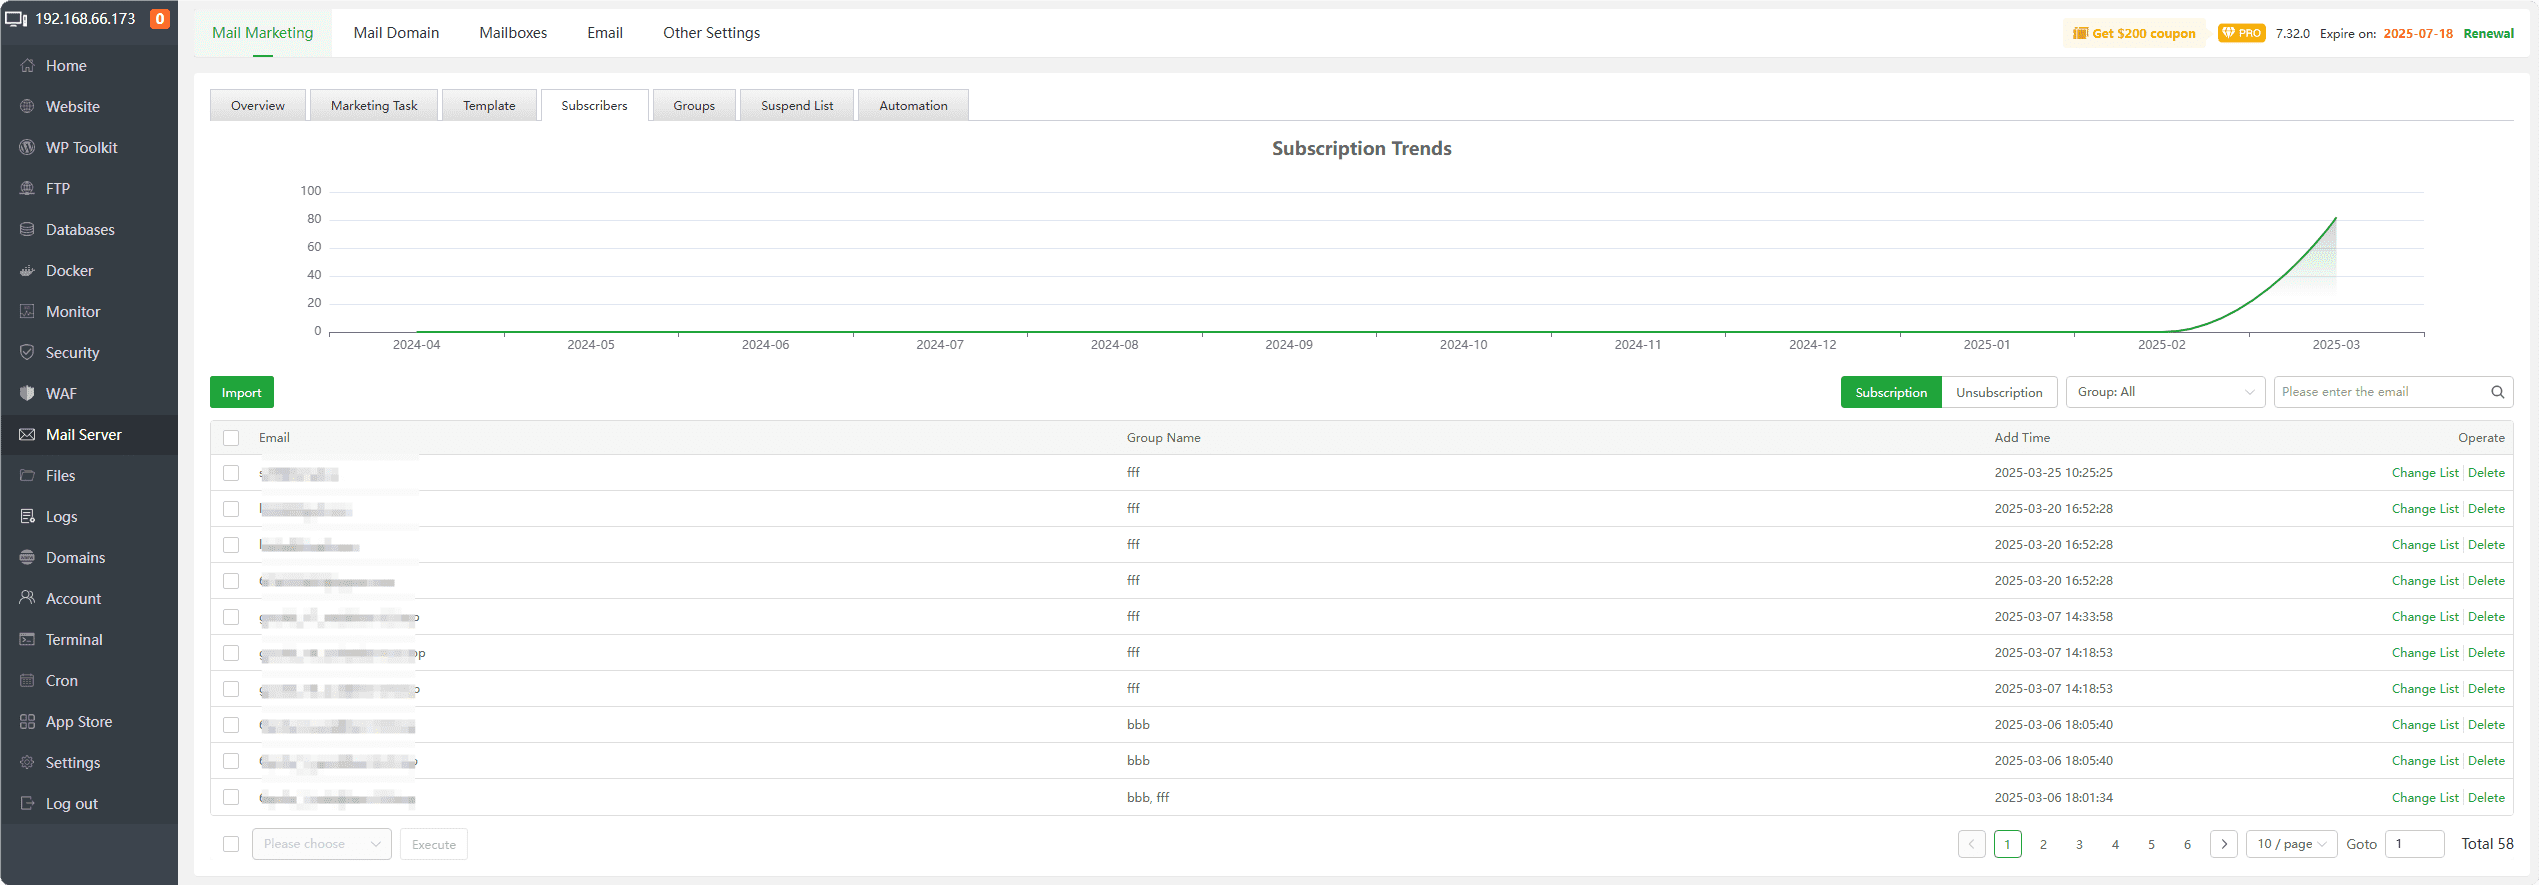
Subscription / Unsubscription Trends: Display the trends of
email subscriberssubscriptions and unsubscriptions.Import: Batch
import email subscribers, supporting files inTxTandJSONformats with one entry per line.Email: Display the
email addressesof the subscribers.Group Name: Show the group to which the email subscribers belong.
Add Time: The time the email subscriber was added.
Change List:
Change groupof email subscribers.Unsubscription / Subscription: Change the
subscription statusof the email subscribers.Delete: Remove email subscribers from the specified group.
Groups
Mail Marketing --> Groups
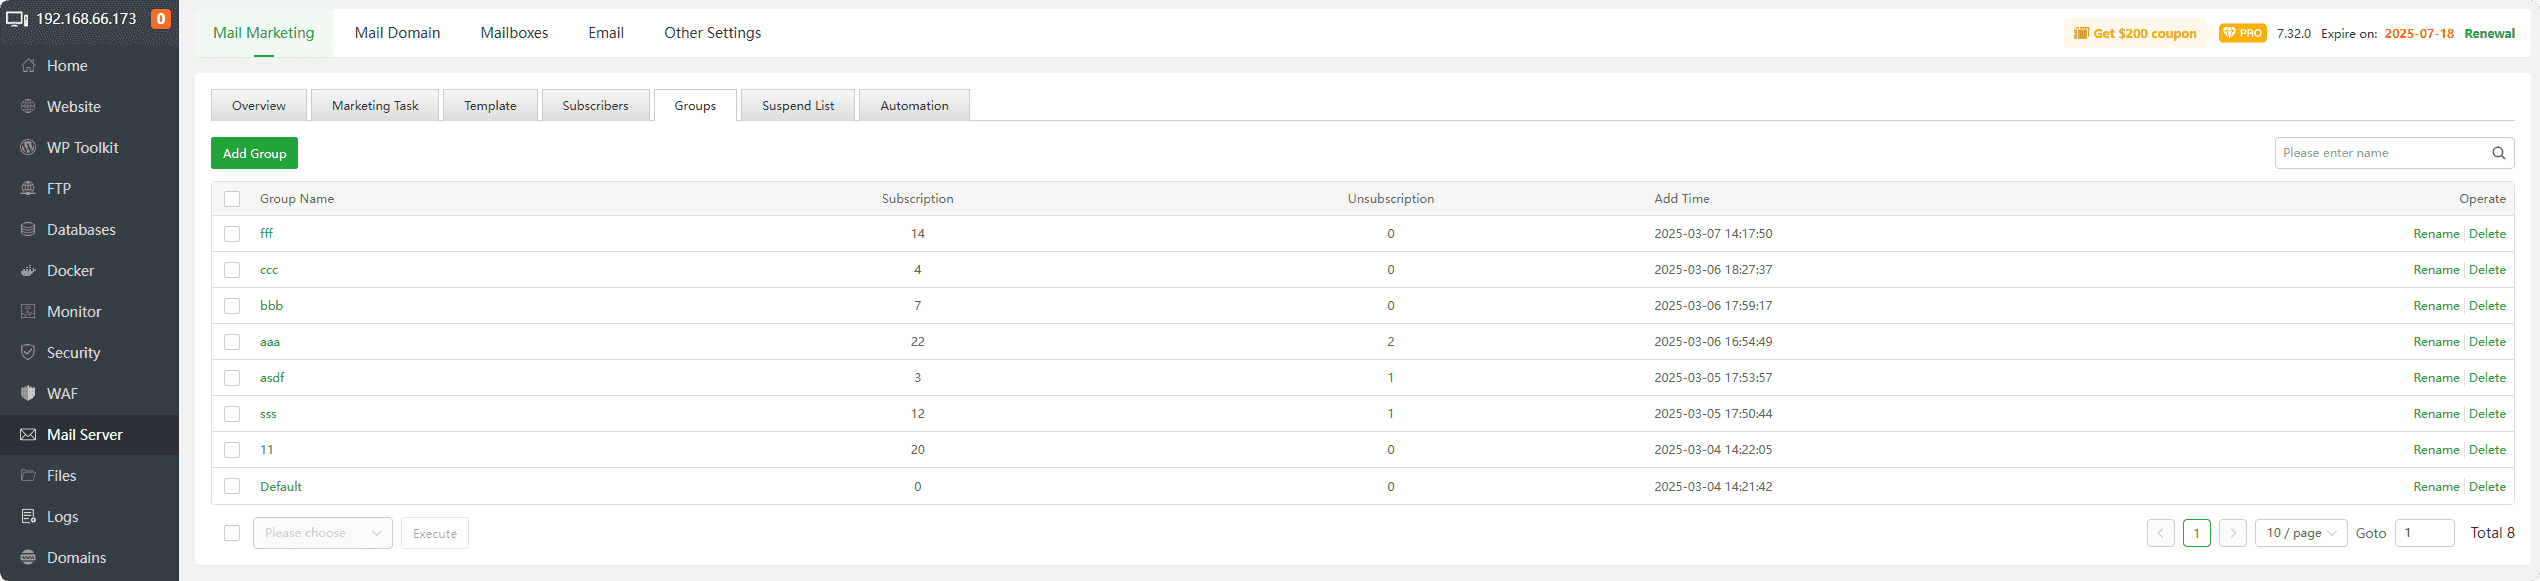
Add Group:
Add email subscription group, which can later be managed through Subscribers.Group Name: The
nameof the email subscription group.Subscription: Display the
number of subscriptionsin the email subscription group.Unsubscription: Display the
number of unsubscriptionsin the email subscription group.Add Time: The time the email subscription group was added.
Rename:
Modify the nameof the email subscription group.Delete:
Removethe email subscription group, including the email subscribers.
Suspend List
Mail Marketing --> Suspend List
Automatically added to the Suspend List for email sending statuses of Deferred or Bounced.
Deferred:
Retry sendingafter a period of time. If it remains undeliverable after multiple attempts, it may change to "Bounced" status.
Bounced: When an email cannot be delivered and is returned to the sender, it is marked as "Bounced". This email has
permanently failedto deliver.
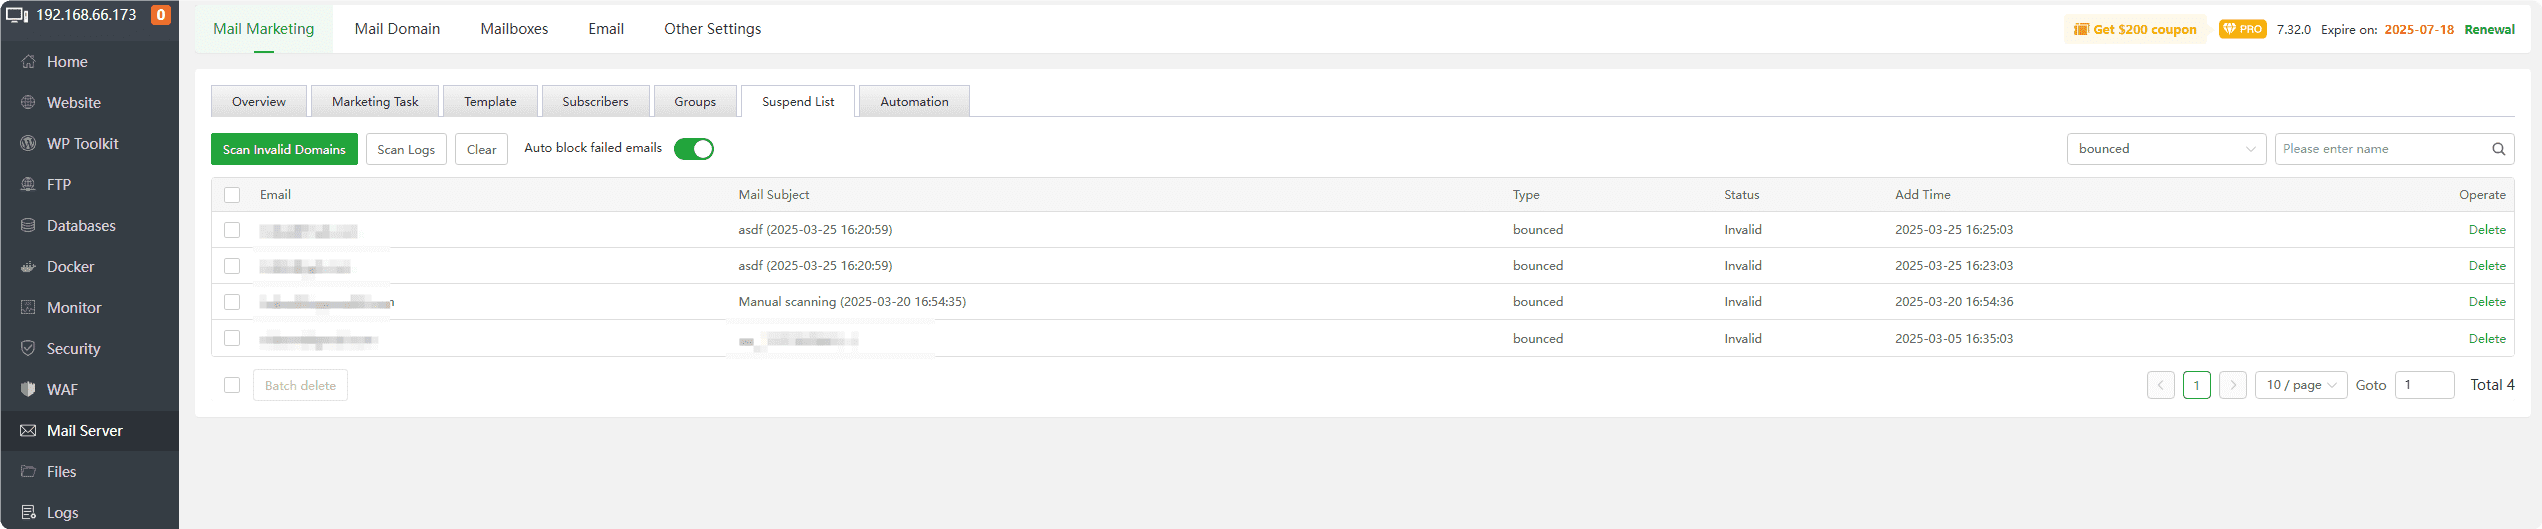
Scan Invalid Domains : Select a subscriber of a group and scan the invalid email address
Scan Logs : View the logs for automatic scanning of invalid domains
Auto block failed emails : Automatically add the failed email address to Suspend List after turning on
Clear: Clear the current list.
Email: Display the email addresses of the subscribers.
Mail Subject: Display the subject of the sent email.
Type: Show the type of email sent:
DeferredorBounced.Status: Display the sending status of the email:
Invalid,Checking.Add Time: The time the email was added to the list.
Delete: Remove the email subscriber from the Suspend List to resend the email.
Automation
Mail Marketing --> Automation
Execute tasks based on set conditions: For example, when there are
new subscribers in Group, automaticallysend emailsto thenew subscribers.
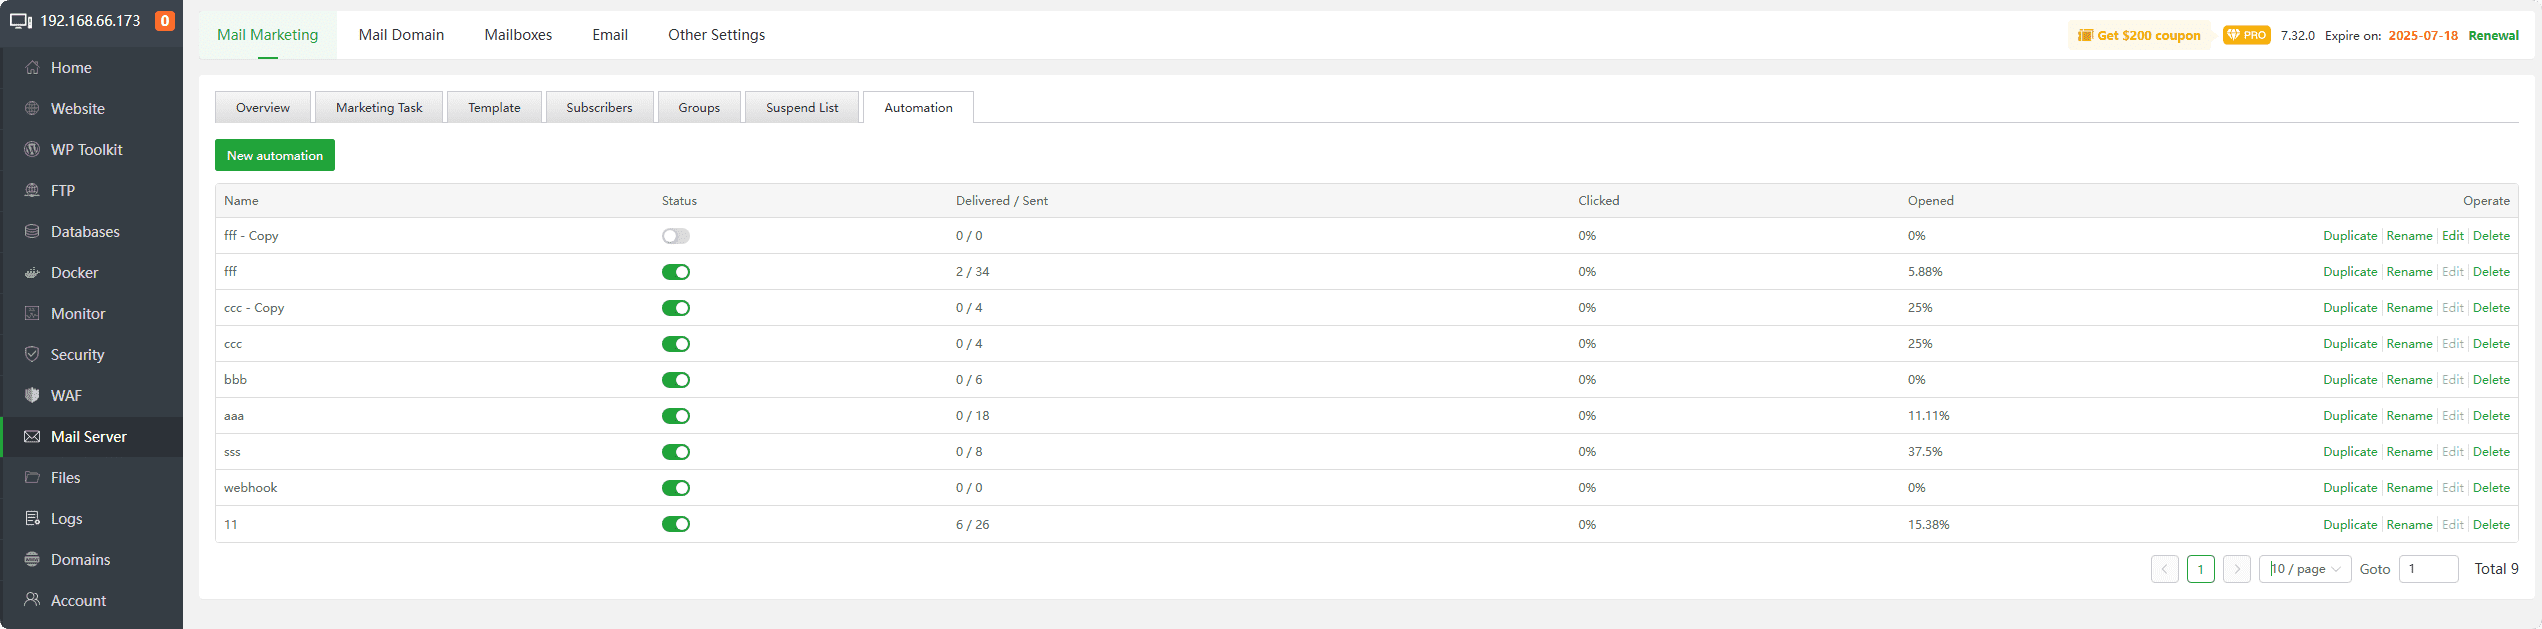
New Automation : Create a new
triggered automation taskName : Display the
nameof the automation taskStatus : Display the
statusof the automation taskDelivered / Sent : Show the number of emails
sentand successfullydeliveredClicked : Display the number of emails that have been
clickedOpened : Display the number of emails that have been
openedDuplicate : Create a
copyof the current automation taskRename : Modify the name of the automation task
Edit :
Modify the content and conditionsof the automation taskDelete : Delete the automation task
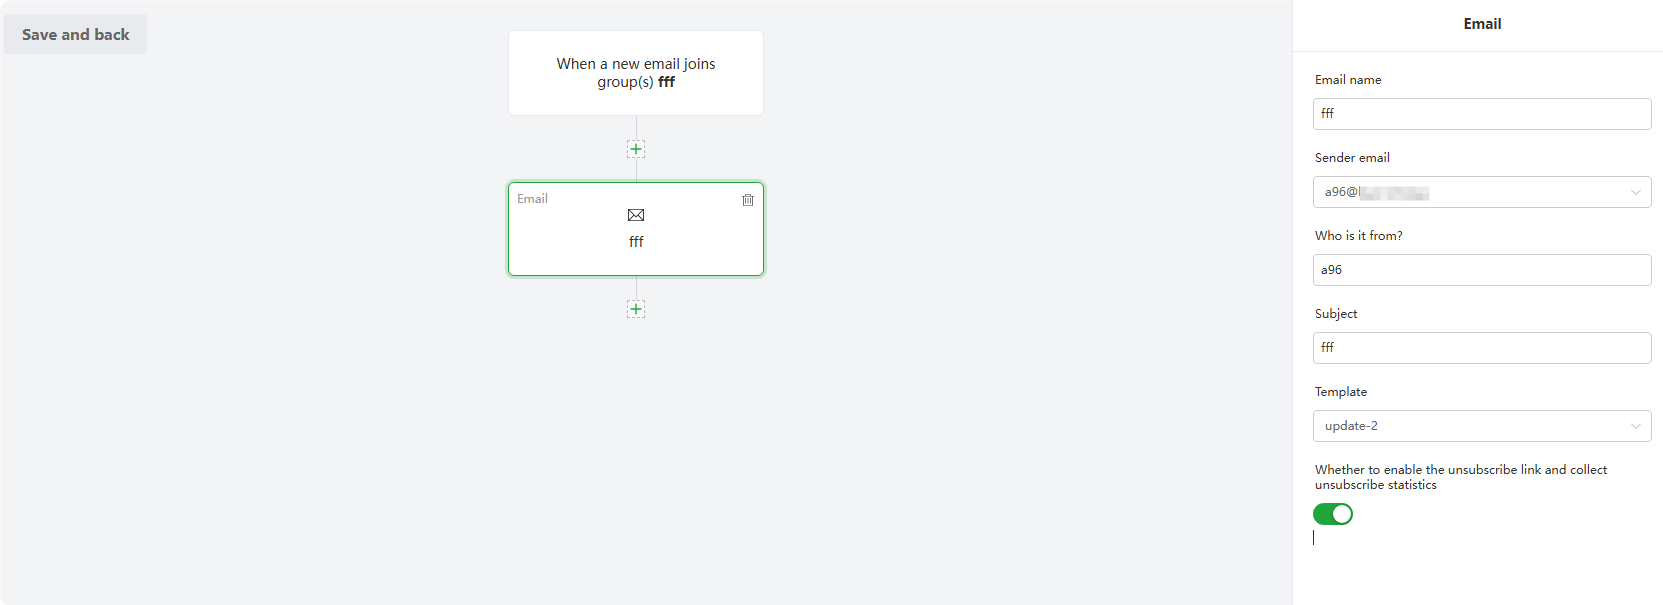
New Automation
Mail Marketing --> Automation --> New Automation
Tip: Ned to have a Group and email Template first. Remember to click Save after selecting
For example: select the group of Specified Group, and if the group has a new subscriber, send an email to the new subscriber
In addition to email, can also choose from: Delay, Webhook

Mail Domain

Add Domain : Add a new domain name to the Mail Server.
Refresh domain record :
Refresh domain name DNS records. Generally, it takes2 minutesor more for new records totake effectafter they are added.Domain name : Display domain name
Not in Spam List: Check if the domain is on the email Spam list immediately and on a schedule. You can enable the option
Notify me when an IP/Domain is blacklistedin Other Settings to receive notifications.Quota : Display the
maximum usage spacecapacity of the domain nameMailboxes : Display the
number of email usersof the domain nameDefault mailbox size : Displays the
default mail spacecapacity of the mail user of the domain nameCatch All : Whether to add catch all of the domain name to receive
non-existent email addressesSSL : Configure the
SSL certificateof the domain name. It is recommended to use thepan-domain name certificate: *.xxx.comWebMail : Add a
Roundcube websiteto the PHP project and manage emails through Roundcube.DNS Record :
Click the DNS recordof the domain name and follow theprompts to addit in the domain name resolution.Edit : Modify the information of this domain name
Delete : Delete this domain name, email users, emails, etc. will also be deleted. Please
back up datato avoid data loss.
Add Domain
Mail Domain --> Add Domain

DNS record :
Automatic,Manualparsing can be selected, whereAutomaticwill automatically addA,MX,SPF,DKIMandDMARC. Note thatAutomaticrequires adding the corresponding DNS API in Domains and having a validSSL certificatefor the domain to function properly.Domain name : Enter the
domain name to be added, such as:aapanel.comA record : Enter the A record of the domain name. This
A record must point to the IP of the server, such as:mail.aapanel.comIPs : Enter the IP address of this server
- The
IP must be consistent with the A recordof the domain name - The IP is consistent in the
Settings of aaPanel. If it is incorrect, please modifyServer IPmanually in the Settings.
- The
Domain quota : Enter the
space capacity limitof the domain nameMailboxes : Enter the
maximum number of email usersto add. New email users cannot be added after exceeding the limit.Catch All : Enter the email address to receive catch all. When the recipient sends a message to a
non-existent email address, it will besent to the catch all email address.
DNS Record
Mail Domain --> DNS Record
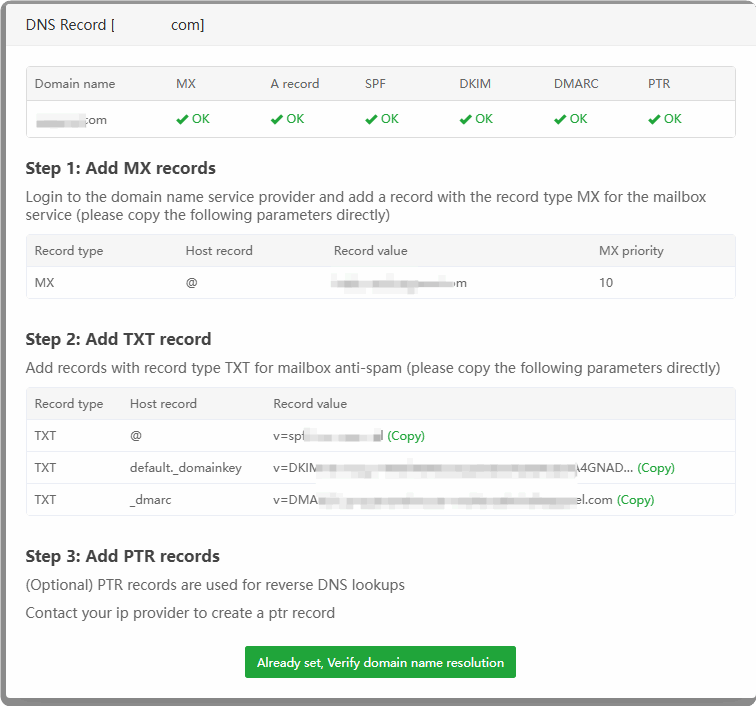
Please follow the prompts to add
MX recordsandTXT recordsat thedomain name providerordomain name management office.PTR recordsare generally configured on theserver provider's website, or at theserver network provider.
For more configuration, please refer to Example
Mailboxes
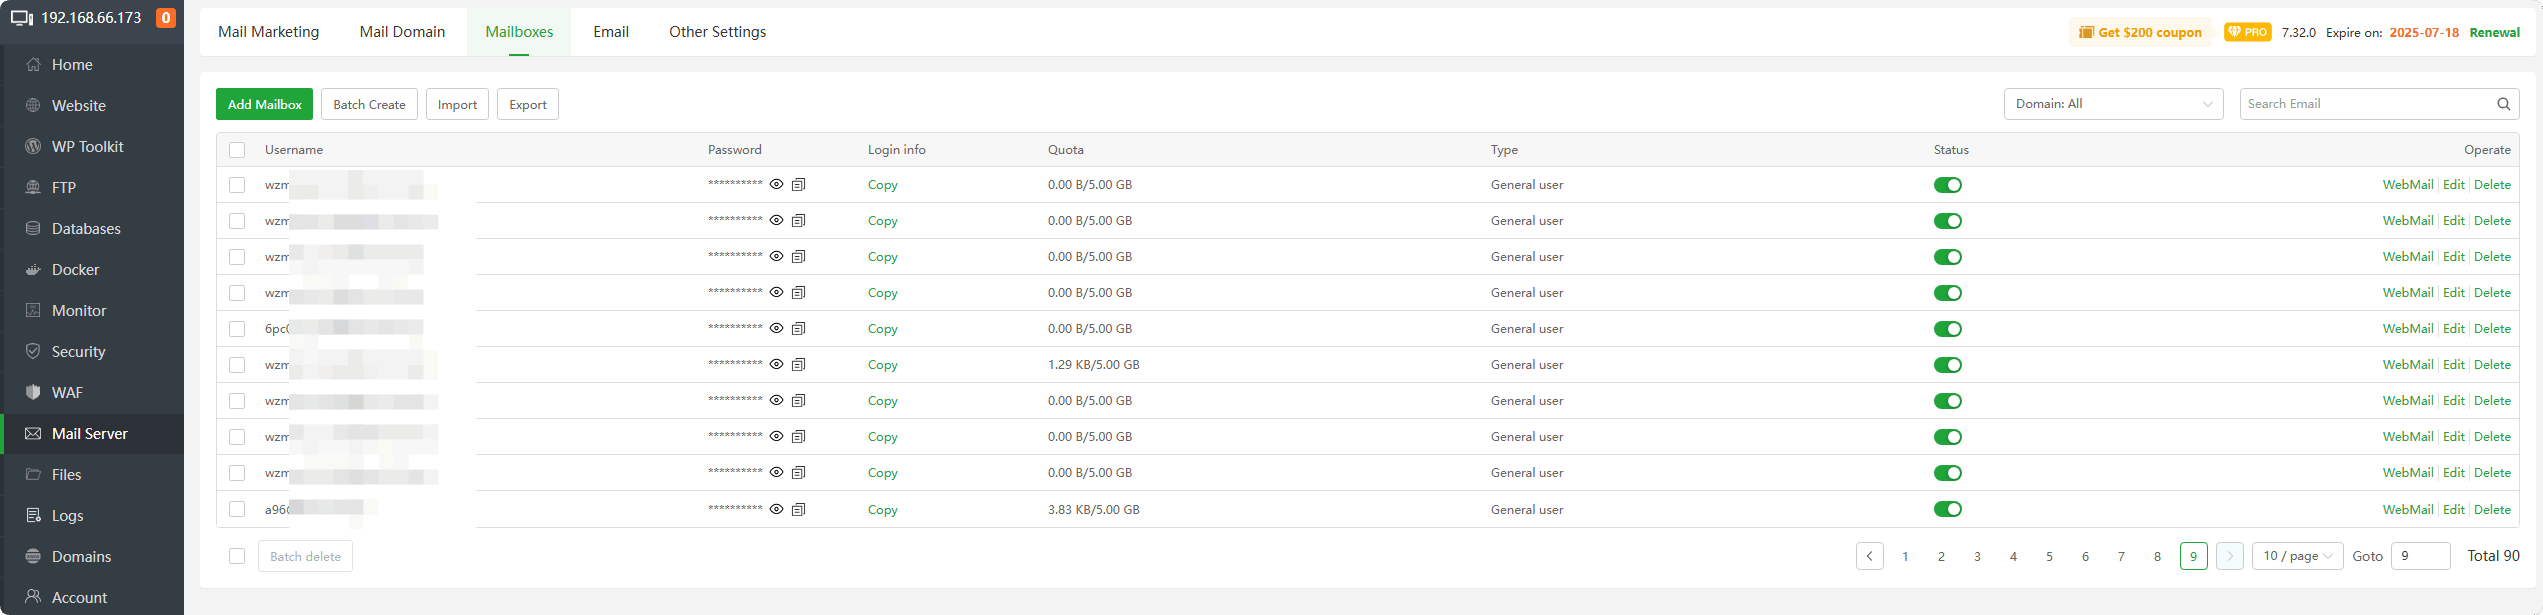
Add Mailbox : Add a new mail user
Batch Create :
Batch createmail usersImport :
Importmail usersExport :
Exportmail usersUsername : Display the email address of the mail user
Password : Display,
copythe password of the mail userLogin info :
Copythe email user’sinformation, password and other informationQuota : Display the
mail space capacityof the mail userType : Display the type of mail user:
General user,Admin.Status : Display the status of the mail user,
disabledorenabledWebMail : Log in
without passwordorenteraccount information tolog in to WebMailEdit : Modify the information of this email user
Delete : If you delete this mailbox user, emails, etc. will be deleted. Please
back up data firstto avoid data loss.
Add Mailbox
Mailboxes --> Add Mailbox
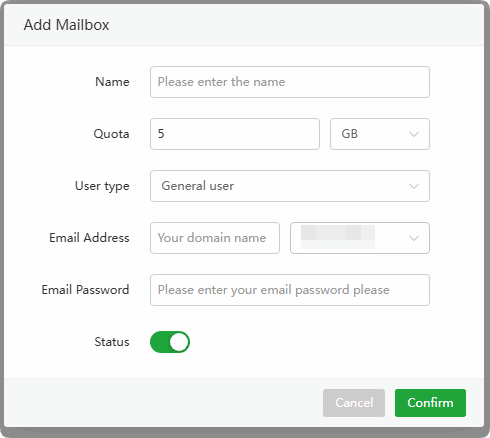
Name : Enter user name
Quota : Enter the
mail space capacityof the mail userUser type : Select the type of mail user:
General user,Admin.Email Address : Enter the
prefixof the email addressEmail Password : Enter the
passwordof the mail userStatus : User status,
disabledorenabled
How to use Mail Client
Click to view How to use Mail Client
Email
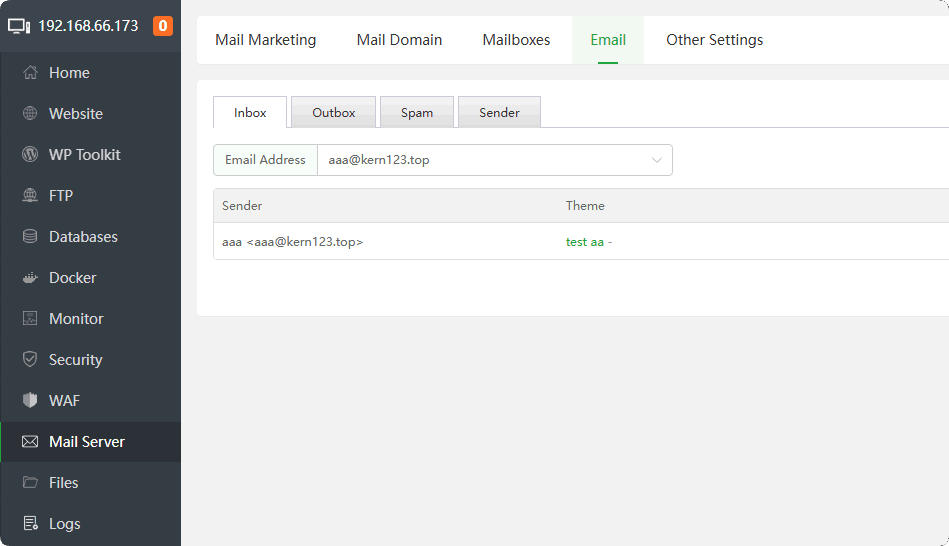
Inbox
Email --> Inbox

View,Spam,DeleteEmails received by the specified user
Outbox
Email --> Outbox
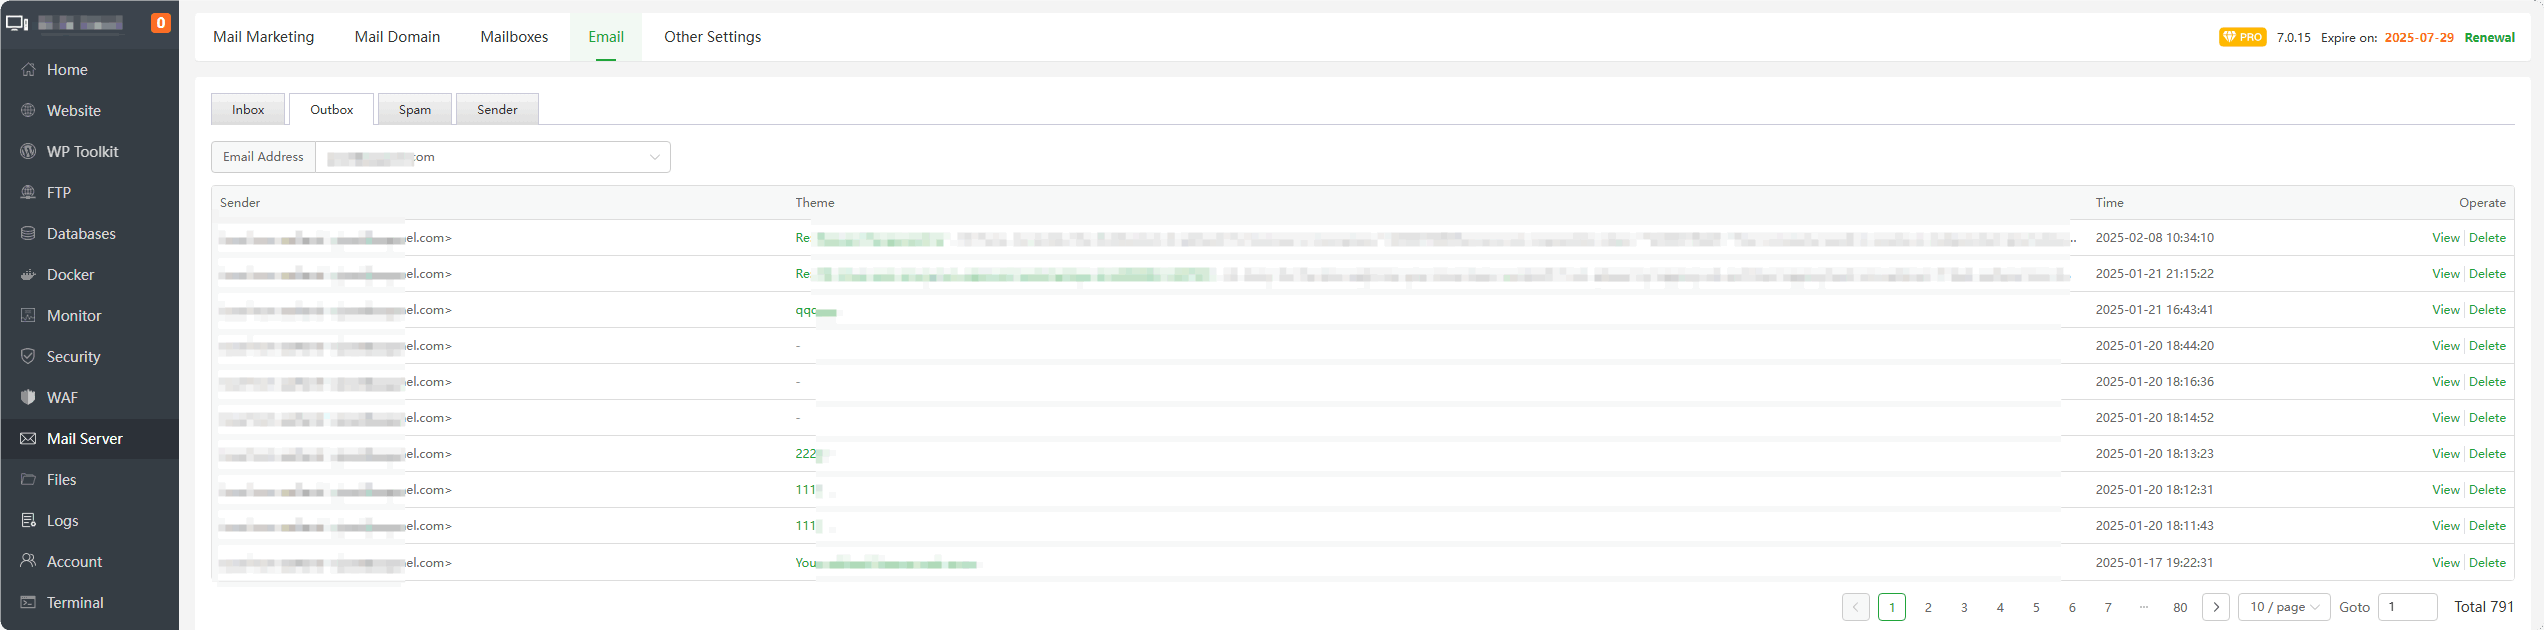
View,Deleteemails that the specified user has sent.
Spam
Email --> Spam
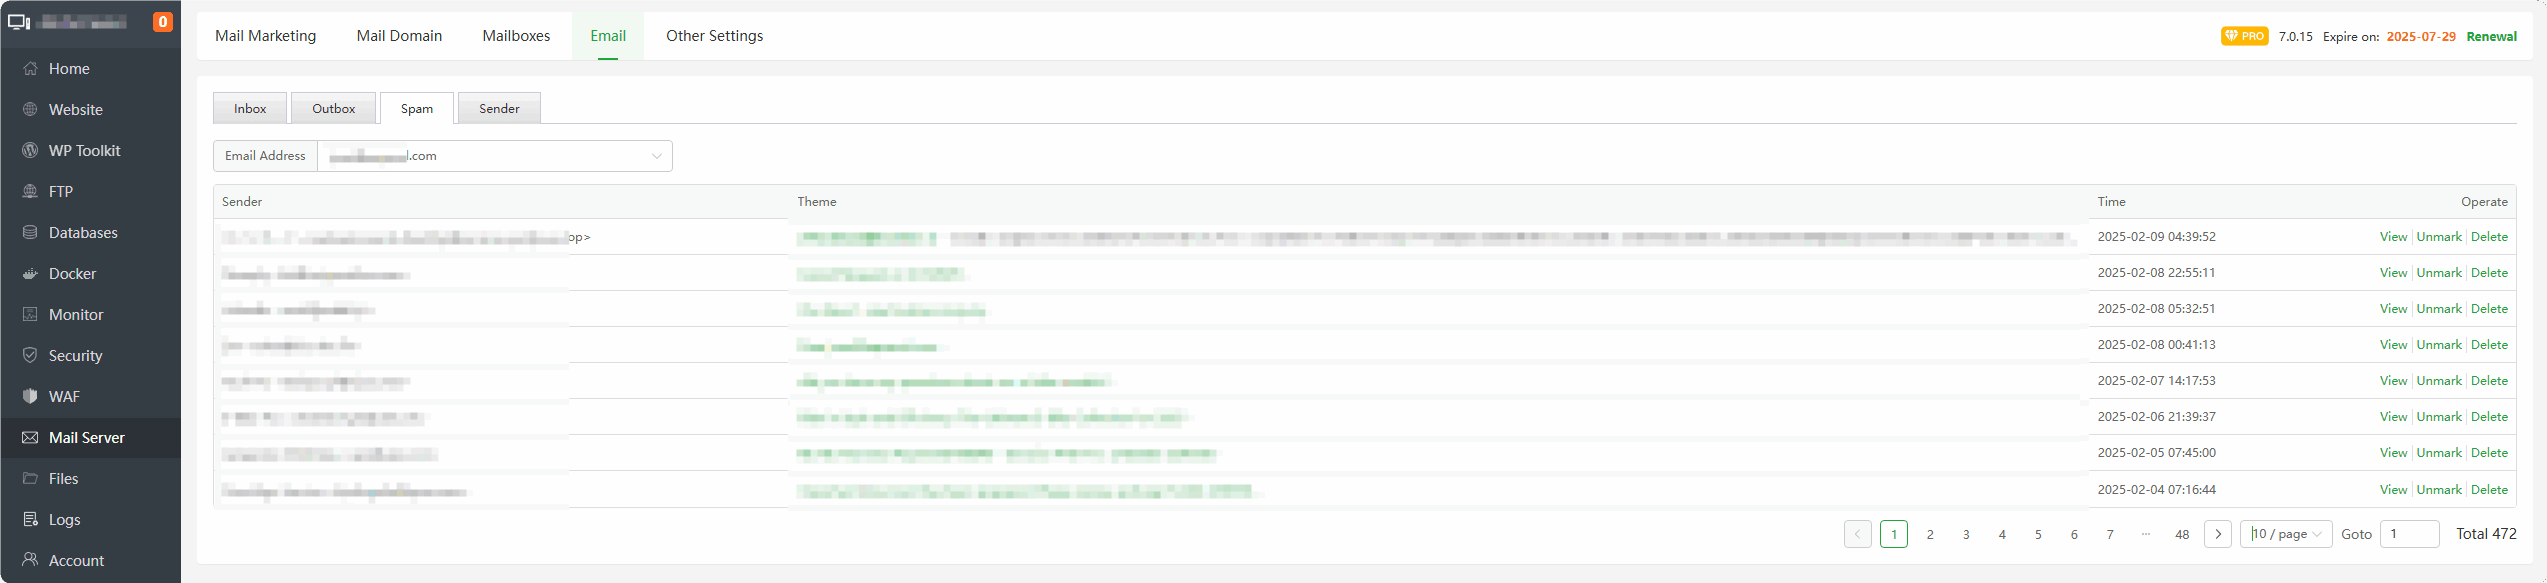
View,Unmark,DeleteMark emails received by a given user as spam
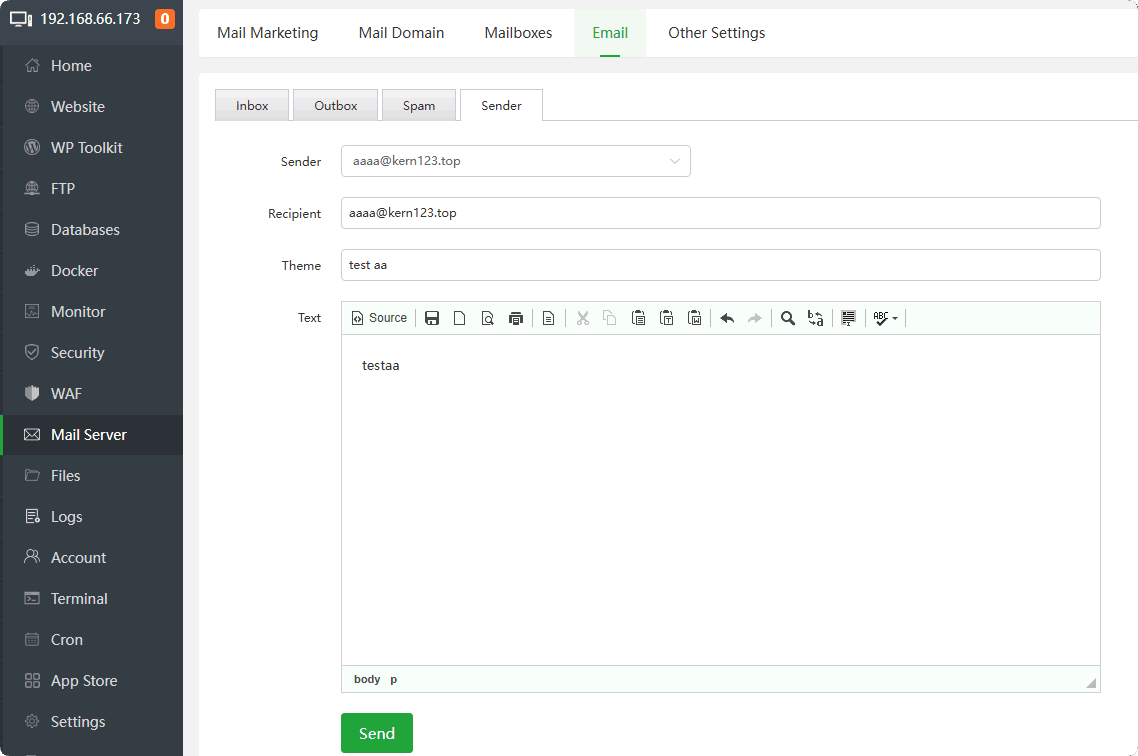
Send mail
Email --> Send mail
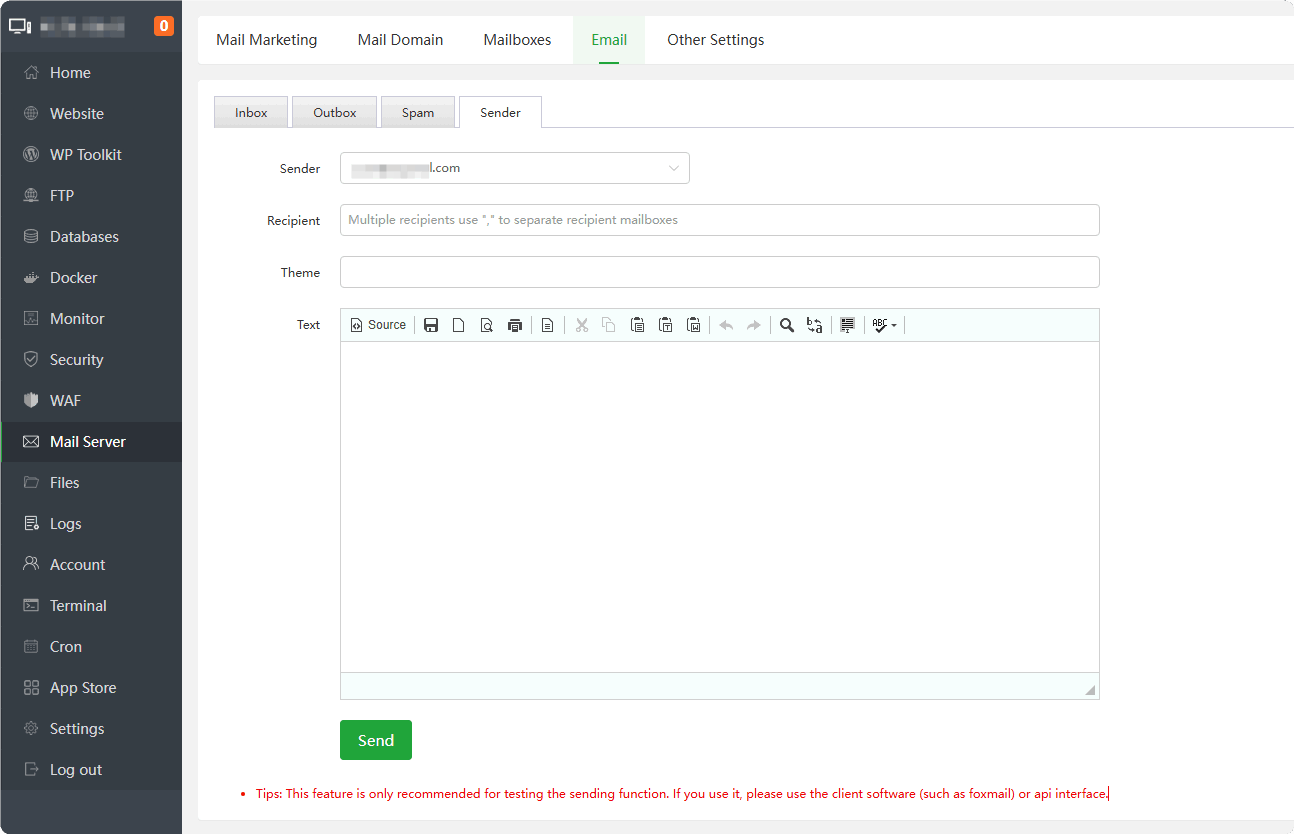
Send emailusing specified user
Tips: This feature is only recommended for testing the sending function. It is recommended that you use an SMTP client to send emails.
Other Settings
Common settings
Other Settings --> Common settings
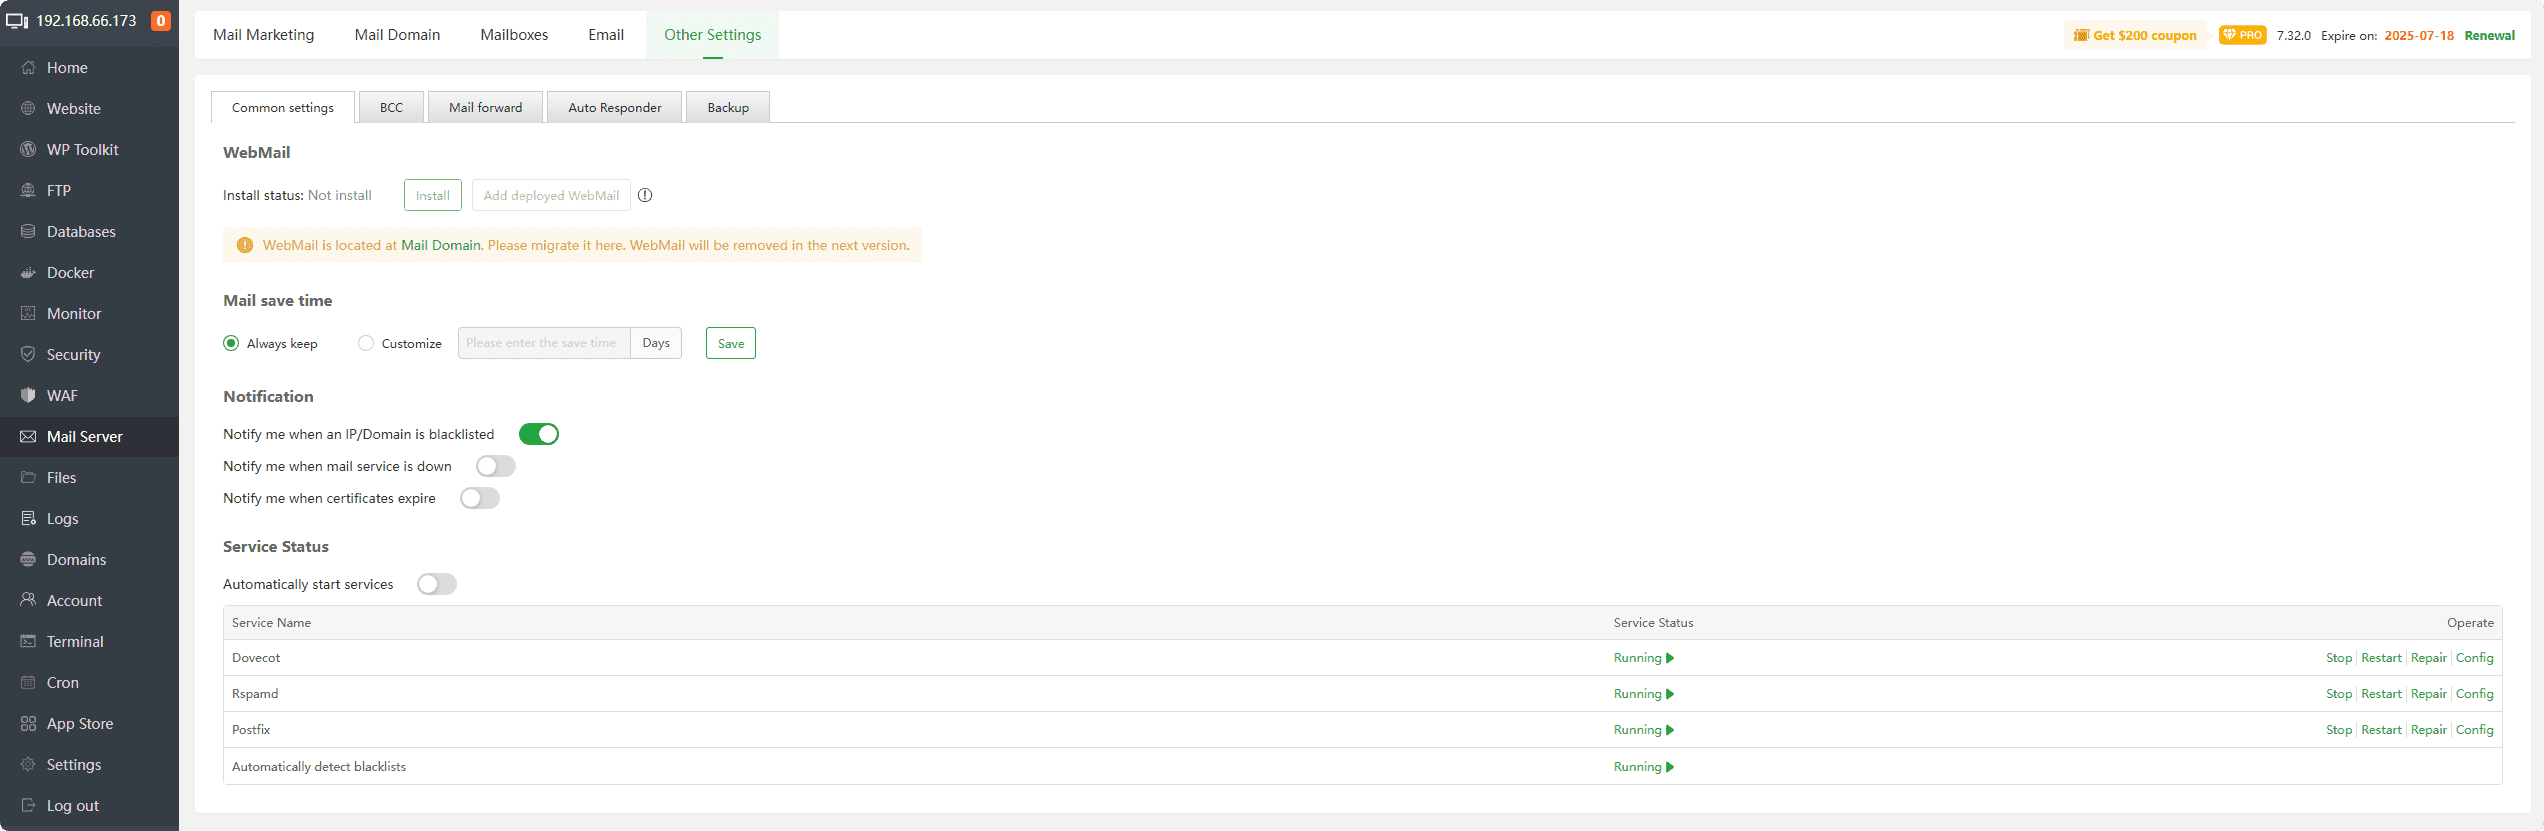
WebMail : Add a
Roundcube websiteto the PHP project and manage emails through Roundcube.Mail save time : Set the storage time of all emails. After this time, the emails will be
permanently deleted.Notify me when an lP/Domain is blacklisted :
Notify me when mail service is down :
Automatically start services : Monitor mail server
postfix,dovecot,rspamdWhether it is running, if not, it willstart automatically.Service Status : Manage mail server
postfix,dovecot,rspamdService status andconfiguration.
BCC
Other Settings --> BCC
BCC is a "Blind Carbon Copy" that allows sending a copy of an email to specified recipients, but hiding those recipients' email addresses from being visible to other recipients.

- Add BCC
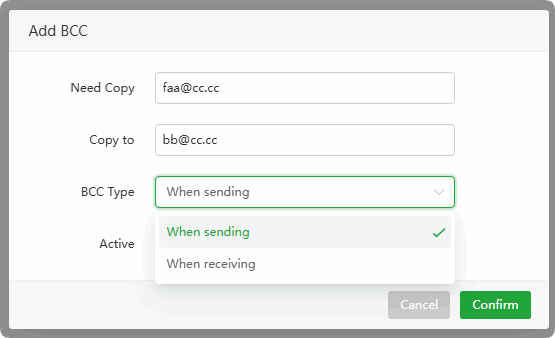
Need Copy : Enter the email address of the
person being BCCedCopy to : Enter the
receiving email addressBCC Type : Select BCC type, supported when
sendingandreceivingemails.Active : Enable BCC
Mail forward
Other Settings --> Mail forward

Add Forward
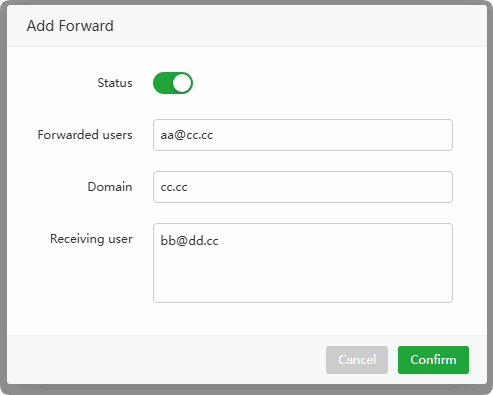
Status : Enable forwarding
Forwarded users : Enter the email address of the user to be forwarded
Domain : Enter the
forwarded domain nameReceiving user : Enter the email address of the user you want to receive
Auto Responder
Other Settings --> Auto Responder
Specify the recipient to
automatically replyto the specified content after receiving the email

Backup
Other Settings --> Backup
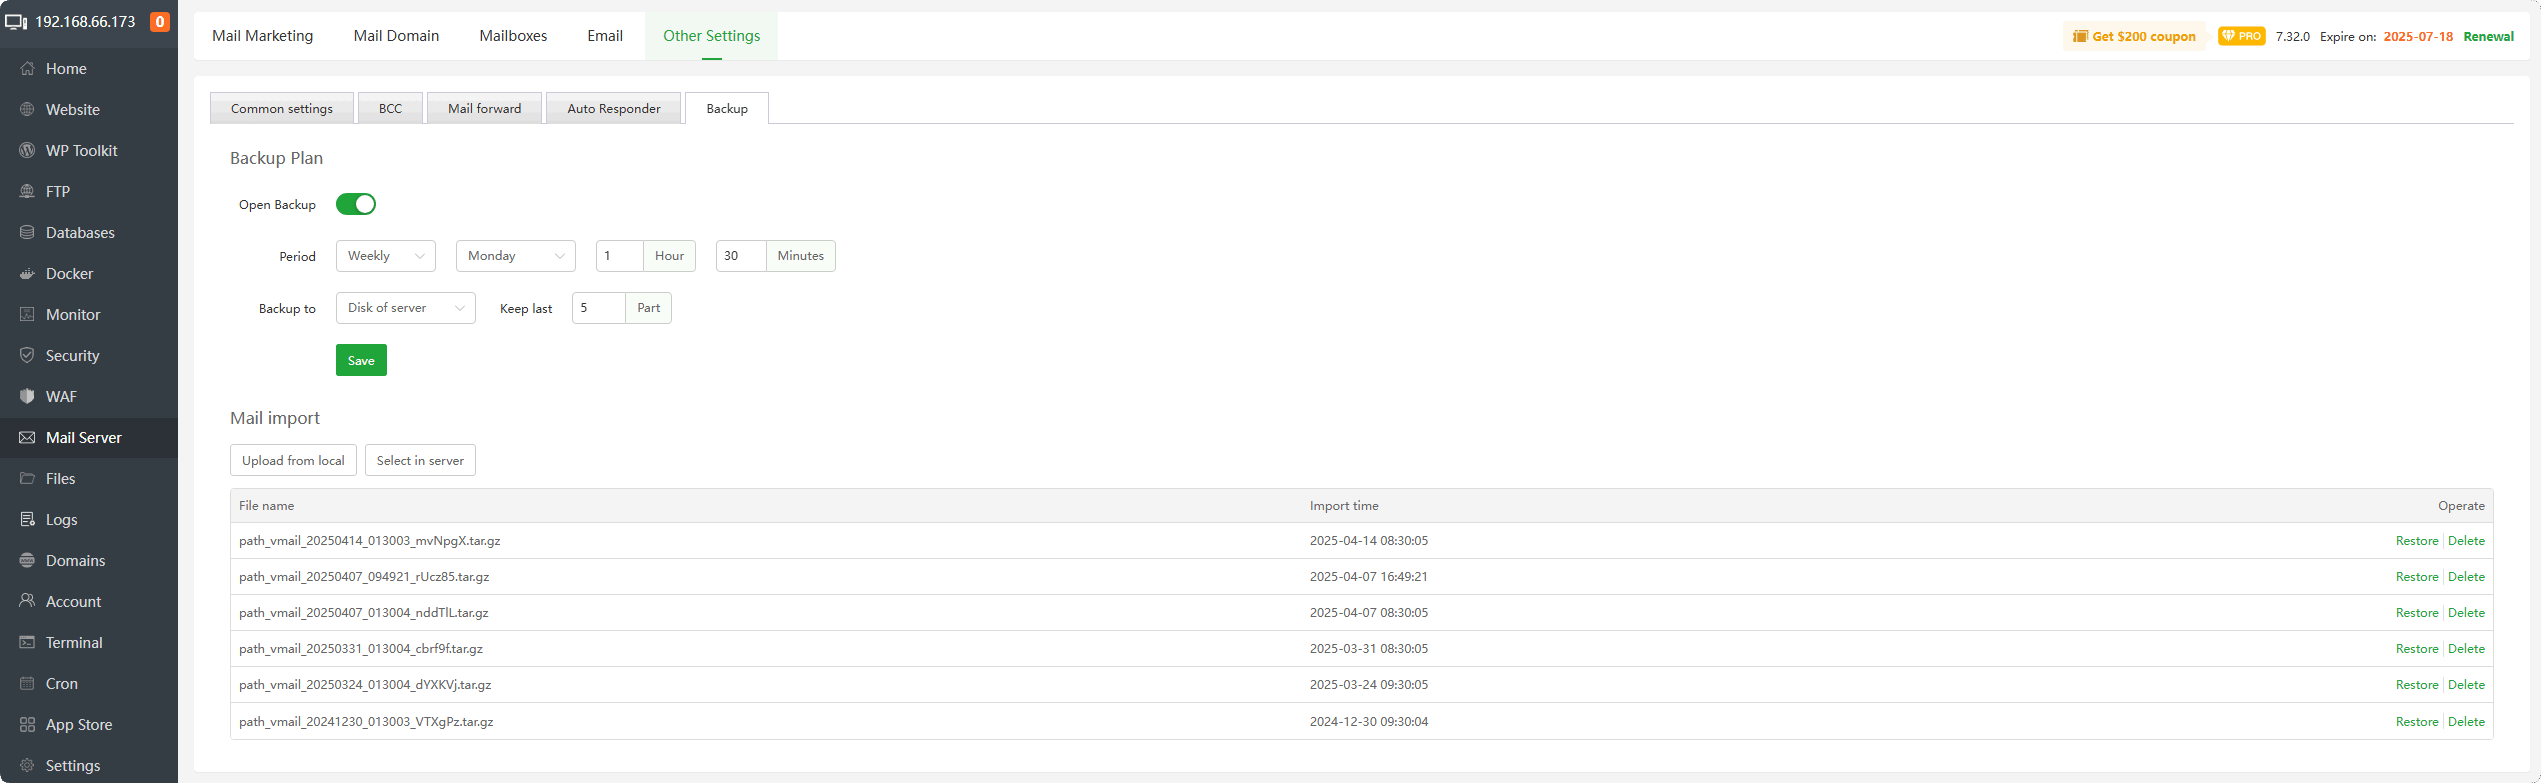
Backup Plan : Set up an
email backup planand back up the email directory/www/vmail.Mail import :
Import backup to server. Can be obtained fromUpload from local,Select in server, import from thebackup list
Example -- Add domain to Mail Server
For example: The domain name is kern123.top, the A record is 173.kern123.top, and the server IP is 192.168.66.173.
This is a sample domain name; please replace it with your own domain name, A record, and server IP.
Add the A record
173.kern123.topin the domain management section, pointing to the server IP192.168.66.173. AS follows:
Add the email domain in aaPanel Mail Server. As follows:
Mail Server --> Mail Domain --> Add Domain
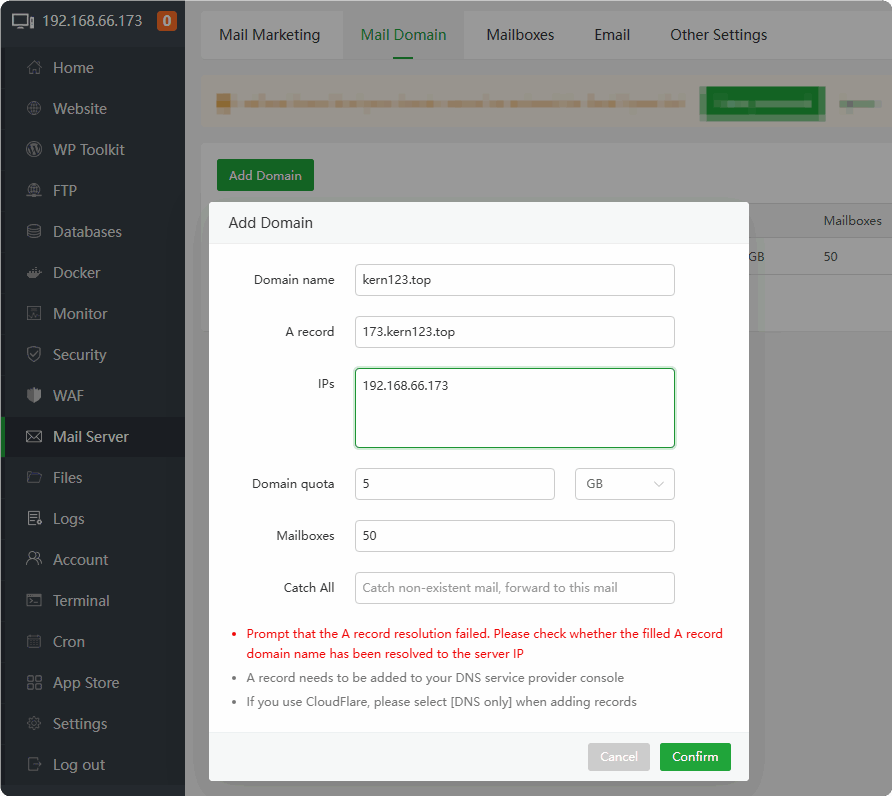
If you receive the message
A record parsing failed:Please check if the
A recordis correct.Please check if the
Server IPthat theA record pointsto is correct.Please check if the IP address displayed in the top left corner of aaPanel is correct. If it is not correct, please go to Setting and modify the
Server IPto your server IP.
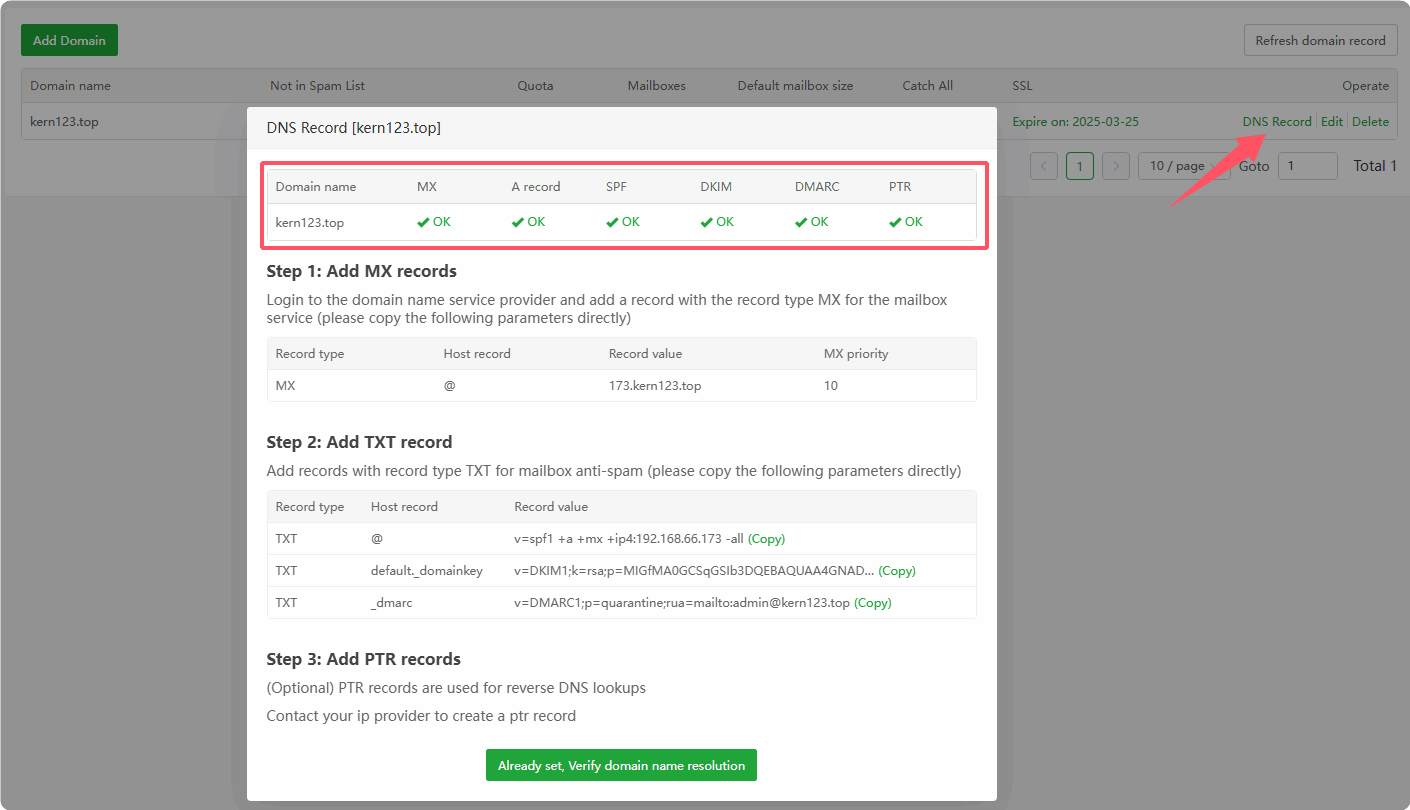
After successfully adding the domain to the mail server, click on
DNS Record.Follow the prompts to add
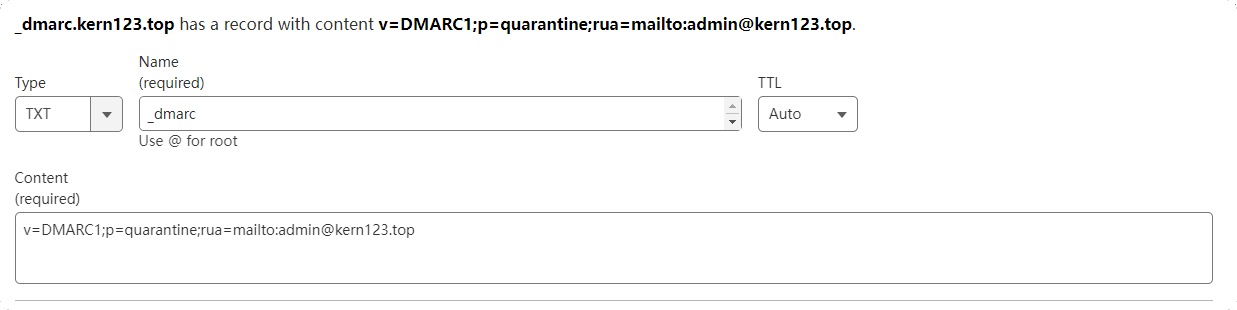
MX,SPF,DKIM,DMARC, and other records in the domain management section, as follows: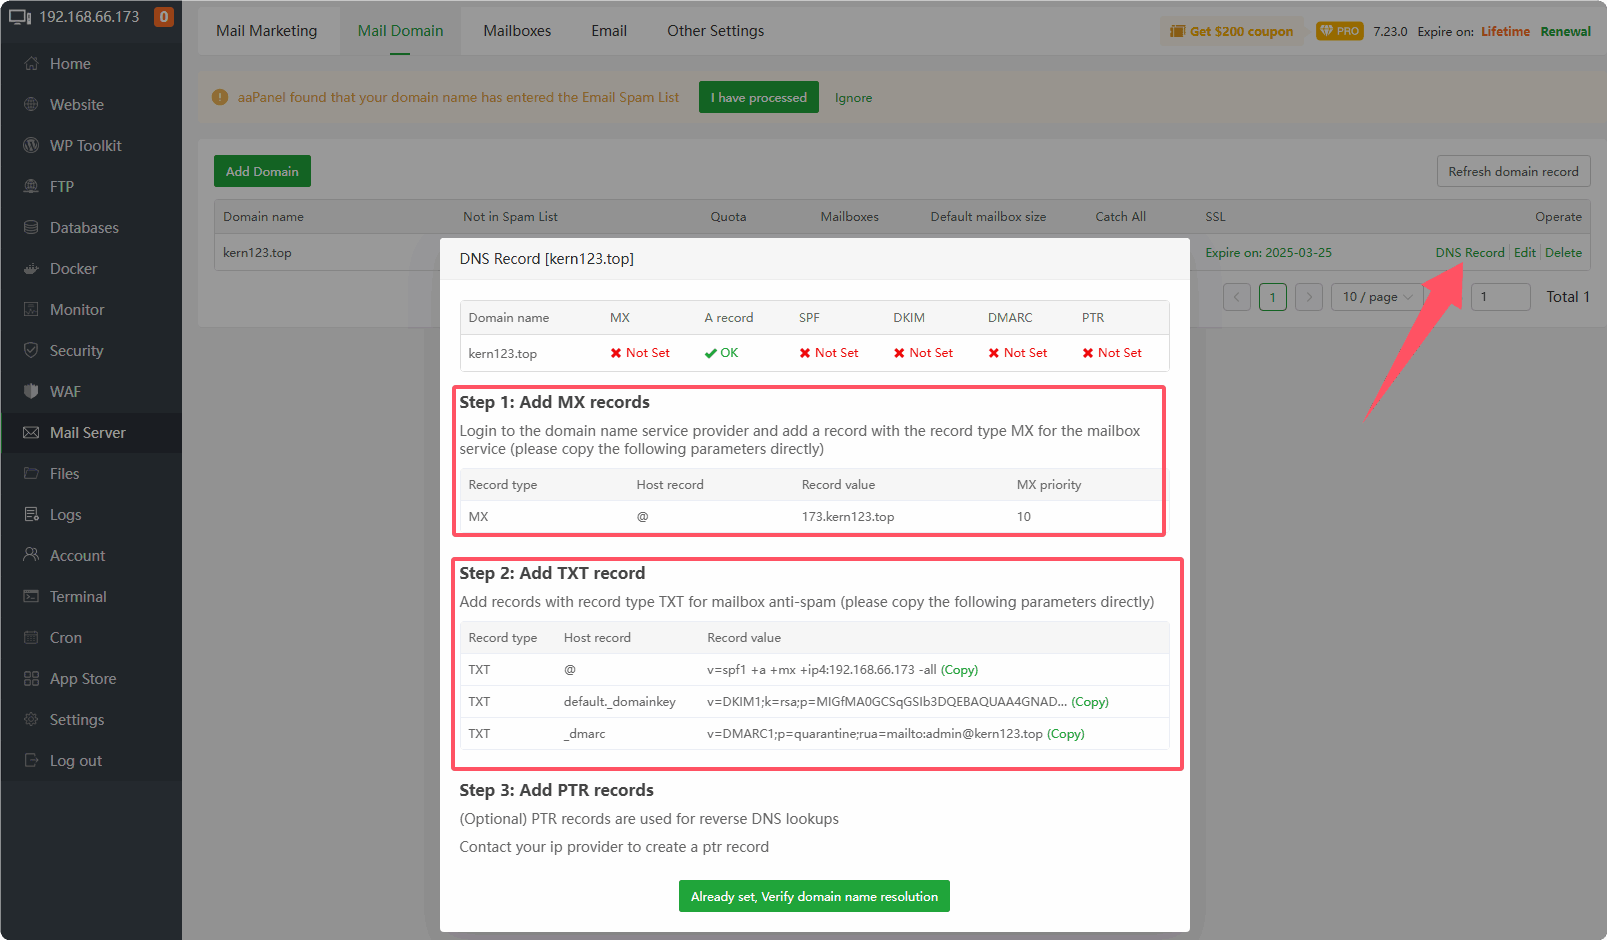
MX Record:

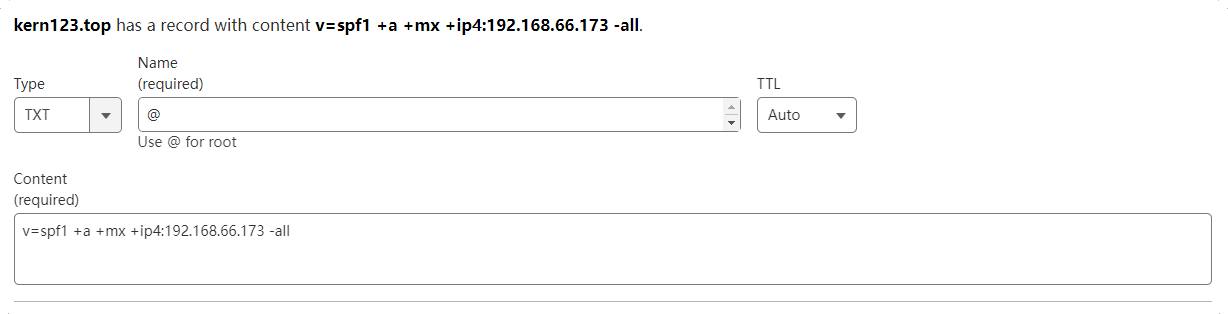
SPF Record:
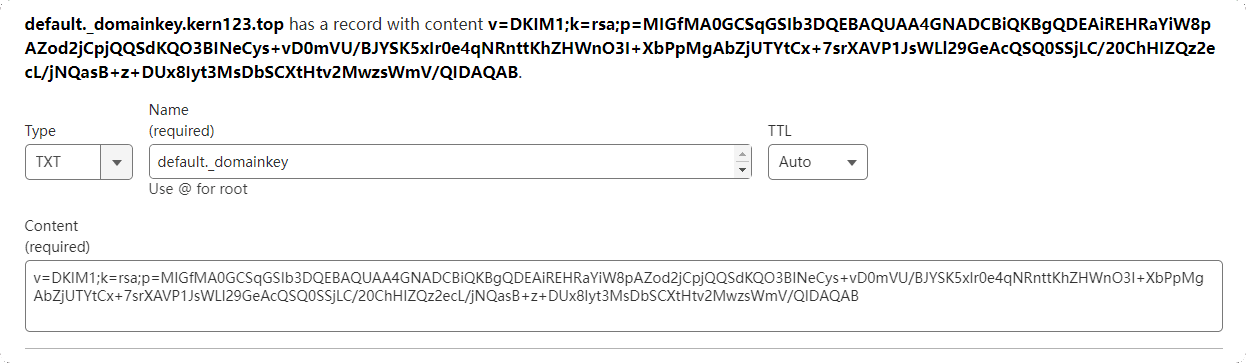
DKIM Record:
DMARC Record:
PTR Record: Generally set up at the
network providerorserver provider.The displayed name may be:
Reverse DNS,PTR Records, orrDNS. Refer to Vultr:
Domain resolution records have been successfully added:

Tips: After adding the domain resolution records, it may take 1-20 minutes or longer to take effect.
The resolution records will take effect, as follows:
You can also use this website to check if the corresponding records are effective:
Deploy the SSL certificate to the domain of the Mail server
You can refer to the tutorial in this guide for deploying the SSL certificate.
Click to view How to apply for a pan-domain name certificate
After adding the domain, you need to add email users to use the email functionality properly.
Mail Server --> Mailboxes --> Add Mailboxe

Send a test email to verify that the functionality is working correctly.
- Send a test email to yourself or another email address:
Mail Server --> Email --> Send mail
- Check your email inbox:
Feedback or Suggestions
If you encounter problems or suggestions during use, please contact us through the following methods:
- (Please describe in
detailor providescreenshots)
Email: [email protected]
Discord: https://discord.gg/Tya5yceBpd
Telegram: https://aapanel.com/tg
GitHub: https://github.com/aapanel/aapanel
If you like aaPanel, please give it a Star