
How to use Files Sync
Used for real-time / scheduled file sync between servers, as well as syncing between two local directories. Suitable for load balancing, cluster deployments, offsite backup and other file sync scenarios.
Table of Contents
- Overview
- Quick Start
- Receive Tasks
- Send Tasks
- Local Backup Task
- Filter Rules
- Logs & Log Settings
- Global Config
- Usage Examples
- Notes & FAQ
1. Overview
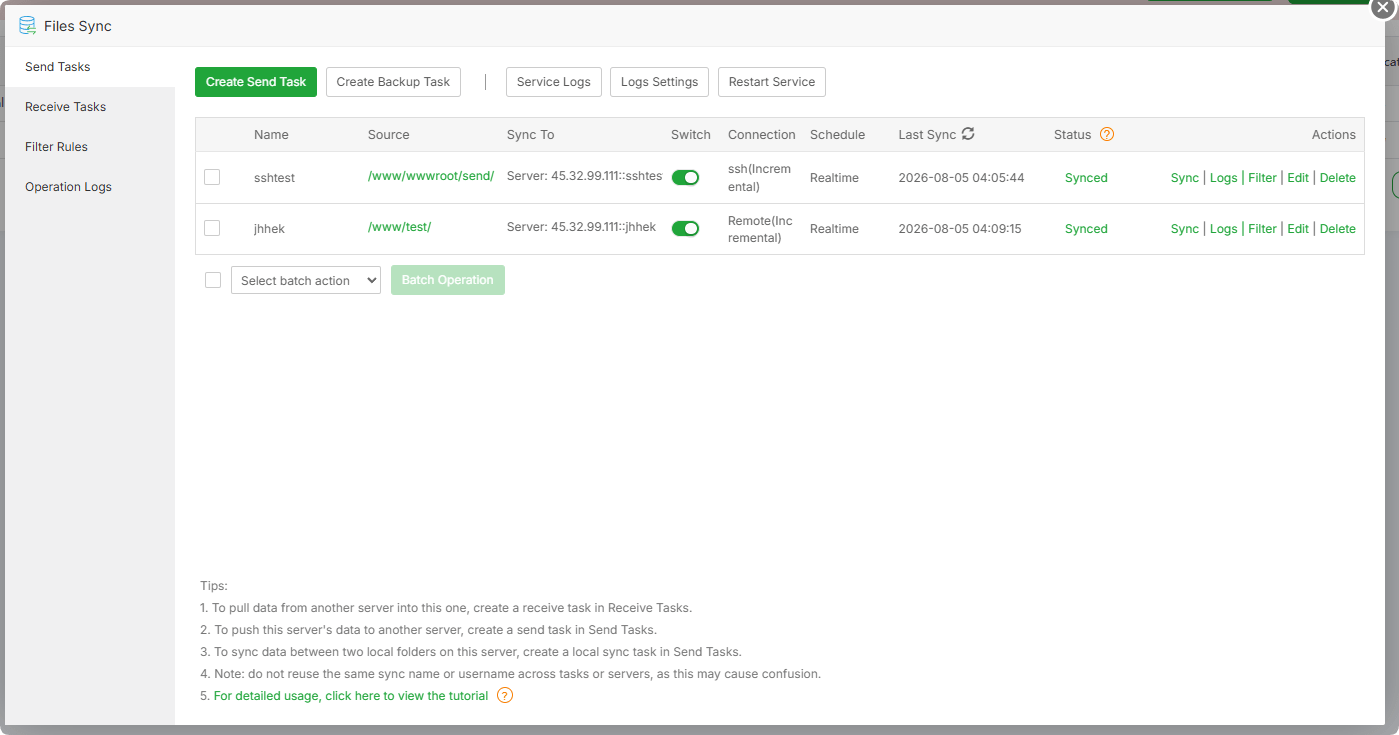
| Menu | Description |
|---|---|
| Send Tasks | Push (sync) local directory to other servers or to another local directory |
| Receive Tasks | Receive files pushed from other servers and write them to a local directory |
| Filter Rules | Manage reusable exclude / include filter templates |
| Operation Logs | View this plugin's operation records |
Key features:
Push files from Server A to Server B (Send Task)
Pull files from Server B to Server A (Receive Task)
Real-time sync between two local directories (Local Backup Task)
Real-time / scheduled sync modes
Filter rules (exclude / include specific files)
Usage tips:
To pull data from another server to this one, create Receive Task in Receive Tasks
To push this server's data to another server, create Send Task in Send Tasks
To sync two local folders, create Local Backup Task in Send Tasks
Do not reuse the same sync name or username across multiple tasks or servers, to avoid confusion
2. Quick Start
Using "Server A pushes to Server B" as an example:
Step 0: Install Files Sync
Open the aaPanel App Store , search for
Files Syncand click InstallStep 1: Create a receive task on the receiver (Server B)
Go to Receive Tasks -> click Create Receive Task
Fill in the Receive Directory / Username / Password and submit
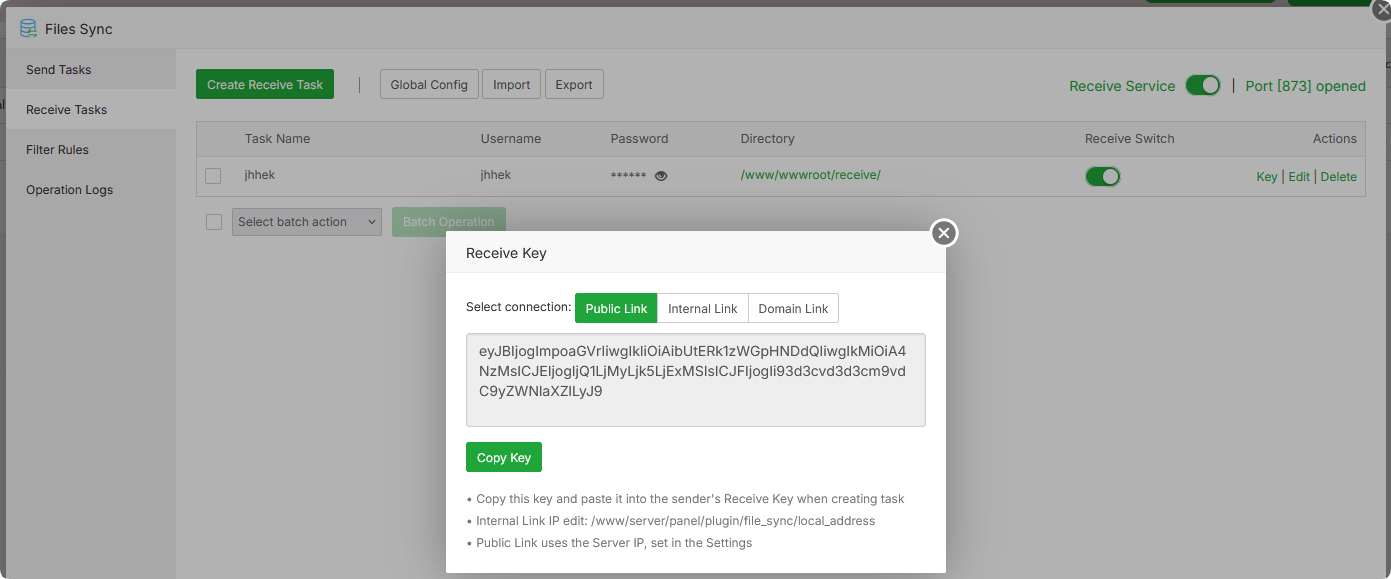
Turn on the Receive Service switch and make sure the port (873 by default) is allowed in the firewall/security group (the page shows
Port [873] openedornot opened)Click Key on the task row and copy the generated Receive Key
Step 2: Create a send task on the sender (Server A)
Go to Send Tasks -> click Create Send Task
Select rsync as the Connection and Key as the Verification
Fill in the receiver's Server IP/Domain and Port, and paste the key copied in Step 1 into Receive Key (receiver info is auto-displayed after pasting)
Select the Source Directory (the directory to sync)
Click Sync Now to run sync immediately
Step 3: Check the result
The Status column in the send task list shows
Synced(success) /Sync error(failure, click for details)Click Logs on the task row to view the detailed sync log
For more details, please see Usage Examples
3. Receive Tasks
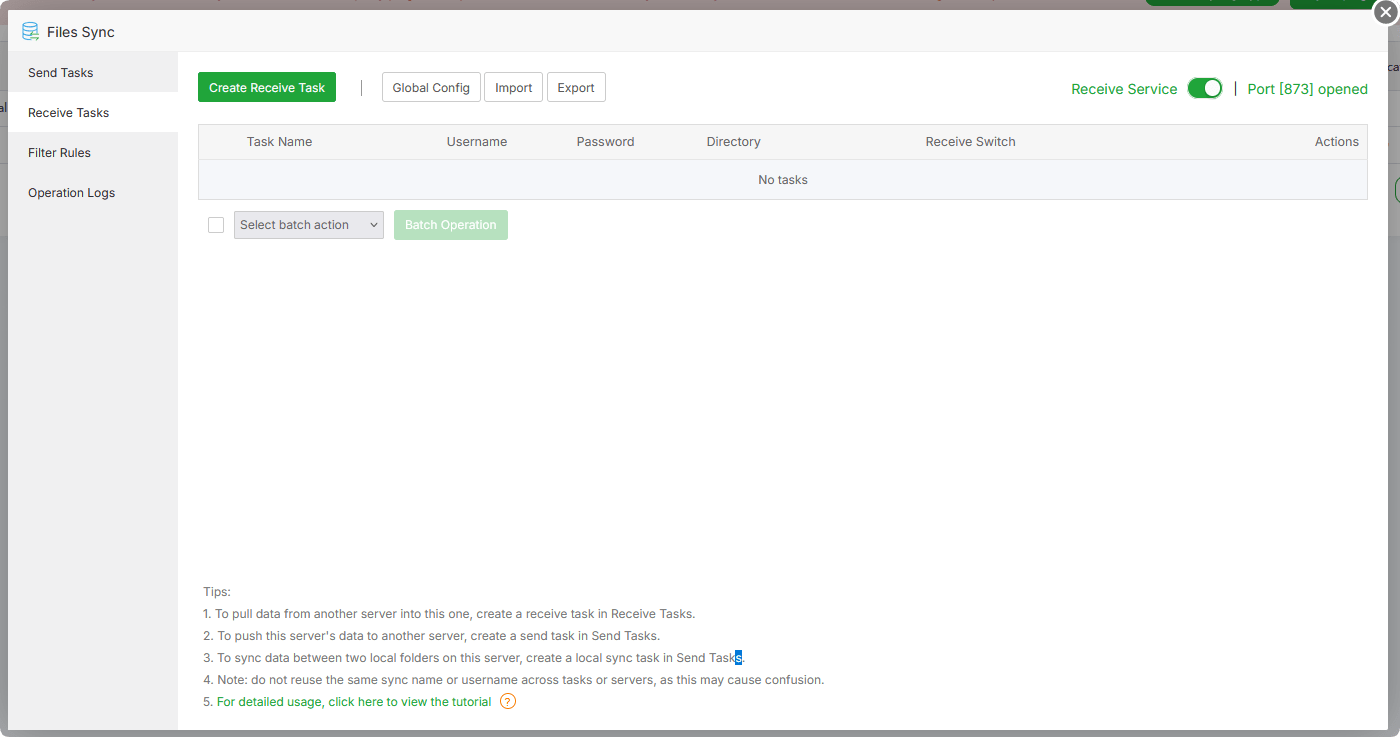
3.1 Create Receive Task
Click Create Receive Task and fill in:
| Field | Description |
|---|---|
| Receive Directory | Local directory where received files are stored |
| Username | Username (receive account used by the sender to connect) |
| Password | Password; click the circular icon on the right to generate a random one |
| IP Whitelist (shown only when creating) | IP whitelist, comma-separated, e.g. 1.1.1.1,192.168.1.2; leave blank to allow all IPs |
3.2 Receive Task List
| Column | Description |
|---|---|
| Task Name | Task name |
| Username | Receive username |
| Password | Password (click the eye icon to view) |
| Directory | Receive directory (click to open) |
| Receive Switch | Per-task receive switch (start / stop individually) |
| Actions | Key: view / copy the receive key |
3.3 How to Get the Receive Key
The Key is the sender's credential for connecting to this machine's receive account, and is required when creating a send task.
On the Receive Tasks page, click Key in the task's Actions column (create a task first if none exists)
Pick a link type for your network: Public Link (public IP; change via panel Settings), Internal Link (internal IP, editable in
/www/server/panel/plugin/file_sync/local_address), or Domain Link (after binding domain to the server)Click Copy Key, then paste it into the sender's Receive Key field
3.4 Receive Service Switch & Port
The Receive Service switch in the top-right controls the whole receive service (the rsync daemon)
Next to it, the listen-port status is shown:
Port [873] opened/not opened. The port must be allowed in the firewall/security group, otherwise senders cannot connect
4. Send Tasks
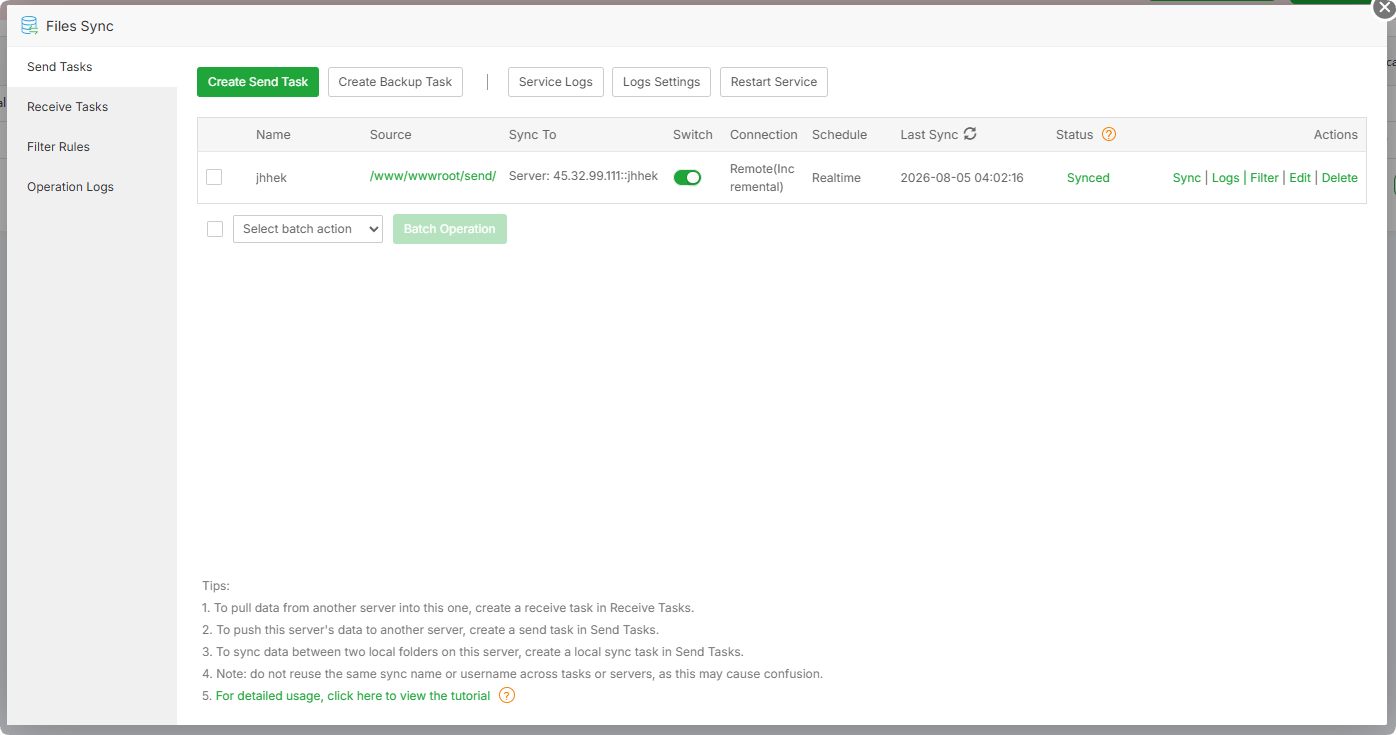
4.1 Create a Send Task
Click Create Send Task — the form has two parts.
Connection Info (Receiver Config)
Field Description Connection Connection method: rsync/SSHVerification Verification method: Key(recommended) /Account(username + password)Name Task name (required for SSH) Server IP/Domain Receiver IP or domain Port Port (873 for rsync, 22 for SSH by default) Receive Key Receiver key (obtained via the Key button in the receiver's Receive Tasks); receiver info is auto-displayed after pasting Receive Directory Directory on the receiver (remote path for SSH) Username / Password Receiver account credentials when Verification is Account Sync Config
Field Description Source Directory Source directory (the directory to sync out) Filter Rules Filter rules Sync Mode Incremental: only sync changes,don't deletefiles;Mirror: target matches source exactly,delete extra filesBandwidth Speed limit, in KB Sync Schedule Realtime/ScheduledSchedule Period: Monthly / Weekly / Daily / Hourly / N minutes / N hours / N days Scheduled Check Interval check: check every N minutes (shown for realtime), 0 disables it More settings
Field Description Compression Transfer compression: Enable / Disable Delay Realtime sync delay (seconds) to buffer changes, default 3s Resume Resume interrupted transfers: Enable / Disable Module Name Receive module name (rsync mode) Subdirectory Subdirectory on the receiver
Tip: The create buttons are Sync Now (sync immediately) and Sync Later (create the task first and trigger the first sync manually)
4.2 Send Task List
| Column | Description |
|---|---|
| Name | Task name |
| Source | Source directory (click to open) |
| Sync To | Target: Local: path / Server: IP::module |
| Switch | Task start / stop switch |
| Connection | Connection method + sync mode, e.g. Remote(Mirror), ssh(Incremental) |
| Schedule | Realtime or a period text (e.g. Daily at 2:00, Every 5 min) |
| Last Sync | Time of the last sync |
| Status | Syncing / Synced / Not synced / Sync error (click for error details) |
| Actions | Sync: trigger a manual sync; Logs: view this task's logs; Filter: adjust filter rules |
5. Local Backup Task (Create Backup Task)
Click Create Backup Task to set up real-time sync between two local directories (backup):
| Field | Description |
|---|---|
| Name | Task name |
| Storage Type | Storage type Local Disk |
| From | Source directory |
| Backup To | Target directory |
| Filter Rules | Filter rules |
| Sync Mode | Incremental: only sync changes, don't delete files; Mirror: target matches source exactly, delete extra files |
| Bandwidth | Speed limit (KB) |
| Compression / Resume | Compression / resume |
| Backup Schedule | Realtime / Scheduled (Daily or N minutes) |
⚠️ Important
- The form clearly warns: the target directory will be cleared; make sure it contains no important files
- If the sync path does not end with
/, data is synced into a subdirectory under the target; if it ends with/, data is synced directly into the directory itself
6. Filter Rules
Filter rules can be selected in Send Tasks, Receive Tasks and Local Backup Tasks; rule templates are managed centrally in the Filter Rules menu.
6.1 Manage Filter Templates
Click Create Filter Rule to create one; Import / Export for bulk import / export of templates
The list shows: Rule Type, Rule Name, Filter Rules
Each row supports Modify and Delete
6.2 Rule Types
Exclude Rule: matched files / directories are NOT synced
Include Rule: only matched files / directories are synced
A template can contain multiple rules, added one by one via the Add button on the right.
6.3 Wildcard Syntax
| Pattern | Meaning |
|---|---|
Starts with / | Matches from the root |
Ends with / | Matches the end of the watched path |
? | Matches any single character (except /) |
* | Matches any number of characters (except /) |
** | Matches any number of characters (including /) |
Example:
*.logexcludes all .log files;/home/www/matches the end of thehome/wwwdirectory from the root
7. Logs & Log Settings
7.1 Operation Logs
The Operation Logs menu in the top navigation shows all operation records of the plugin, paginated in reverse time order.
7.2 Task Logs
Click the Logs column in the Send Tasks list to open the log window:
Left side: switch between receivers (one-to-many tasks)
Right tabs: Sync Logs / Manual Logs
Top shows Log Path and Log Size
Refresh to refresh, Clear Logs to clear the current log
7.3 Service Logs
The Service Logs button in the top-left of the Send Tasks page shows the sync service's runtime log (exec_logs.log); use Refresh to refresh and Clear Logs to clear.
7.4 Log Settings
Click Logs Settings to configure log rotation:
Log Rotation: enable / disable log rotation
Rotation Mode:
By size/By scheduleLog Size: size threshold for size-based rotation (MB)
Execution Time: execution time for scheduled rotation (hour:minute)
Keep Latest: keep the latest N log copies
Compress After Rotation: compress the archive after rotation
8. Global Config
Click Global Config on the Receive Tasks page to configure global parameters (applies to all receive tasks):
| Field | Description |
|---|---|
| Listen Port | rsync listen port (873 by default); open the new port in the firewall after changing |
| Max Connections | Max connections (too high adds load, too low hurts concurrent sync) |
| Timeout | Timeout in seconds, suggested 300–1800 |
| Don't compress | File types that are not compressed, comma-separated |
| IP Whitelist | Global IP whitelist, one IP per line; only whitelisted IPs can send to this server, blank allows all |
9. Usage Examples
Example 1: Realtime file sync between two servers with Rsync
Scenario: Server A is the production site and Server B must stay in sync; files updated on A are automatically updated on B.
Receiver (Server B)
- Receive Tasks -> Create Receive Task
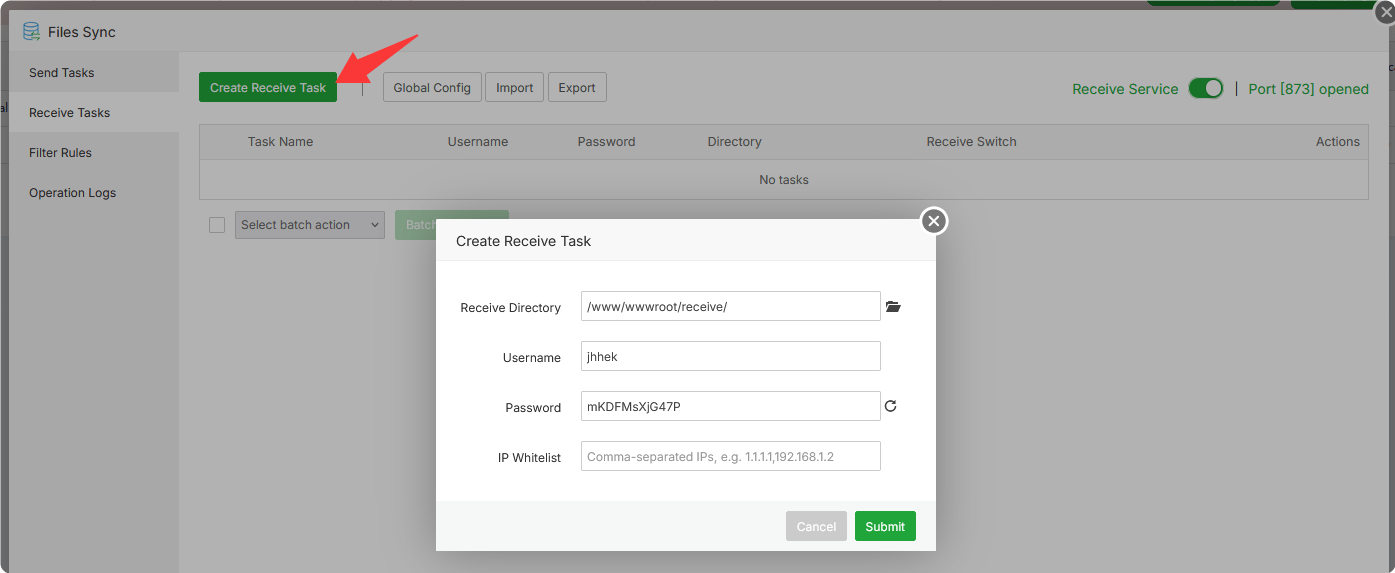
- Select the directory to receive into, e.g.
/www/wwwroot/receive/ - After submitting, turn on the Receive Service switch and confirm
Port [873] opened - After successful creation, a receive key pops up; Copy Key according to your network environment
- Receive Tasks -> Create Receive Task
Sender (Server A)
Send Tasks -> Create Send Task
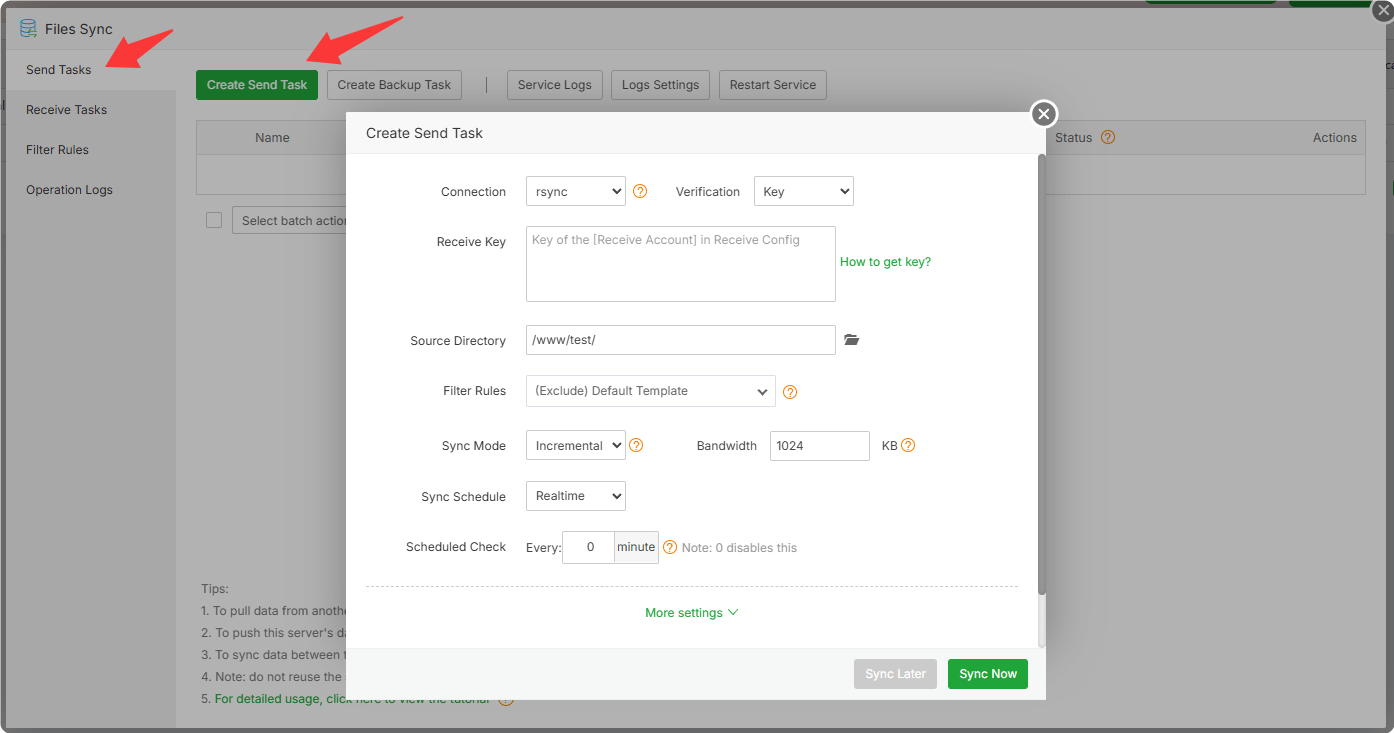
Select
rsyncas Connection andKeyas VerificationPaste the copied receive key into Receive Key
Select the directory to send, e.g.
/www/wwwroot/send/Select
Incrementalas Sync Mode; by default it syncs changes and never deletes files. If you want both sides exactly identical, useMirror.Mirrordeletes files on the receiver (Server B)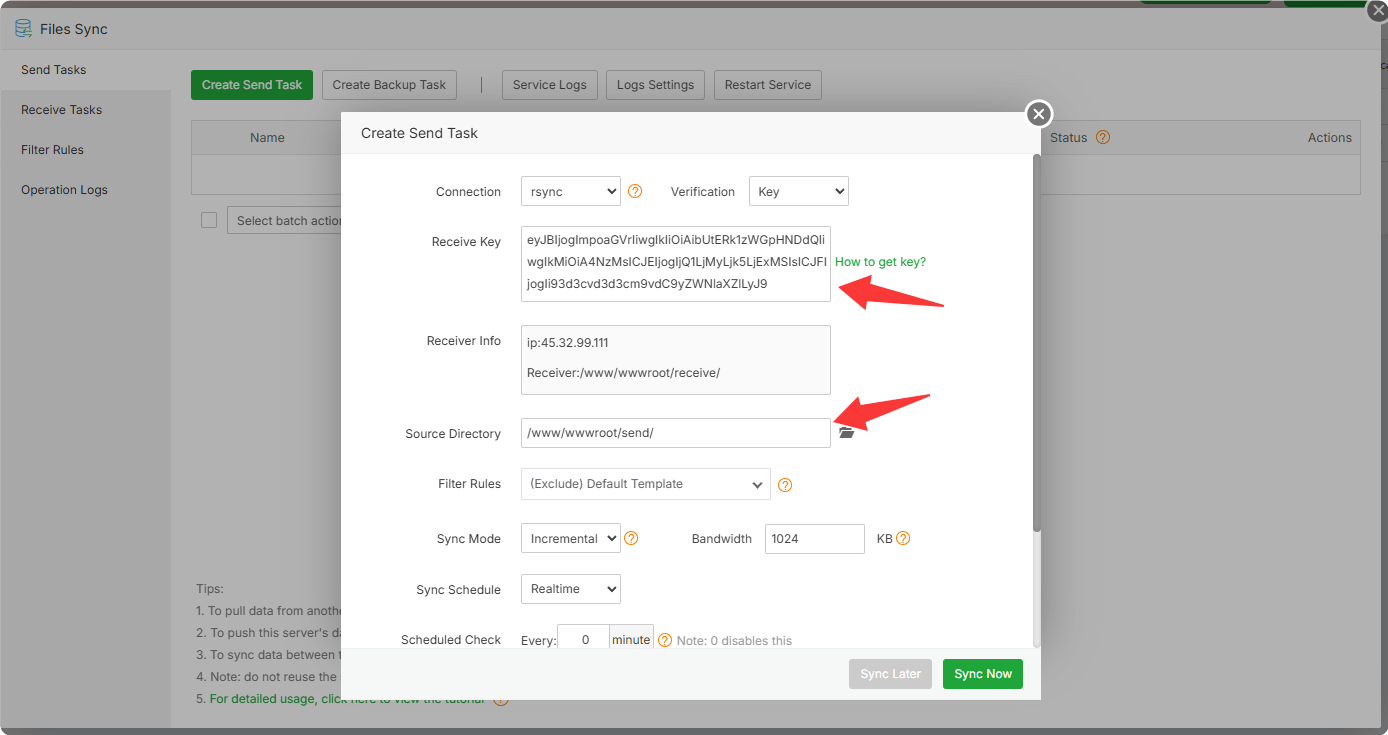
Click Sync Now and complete the add flow; it syncs once first, then any change on A is pushed to B
Create a new file in the source directory to verify it syncs to the receiver (Server B)
Example 2: Sync directly to a target server over SSH
Scenario: the target server does not install this plugin; sync local directory to directory on the target machine via SSH (rsync over SSH).
- Sender (this machine)
Send Tasks -> Create Send Task
Select SSH as Connection
Name: enter a task name, e.g.
sshtestServer IP/Domain: enter the target server IP
Receive Key: enter the target server's SSH login key (private key)
Username: defaults to
root; you can change it to any account with permission on the targetReceive Directory: enter the target directory, e.g.
/receive/Source Directory: enter the local source directory, e.g.
/www/wwwroot/send/Set Sync Mode (Incremental/Mirror) and Sync Schedule (Realtime/Scheduled) as needed
Click Sync Now to test the connection and run a sync
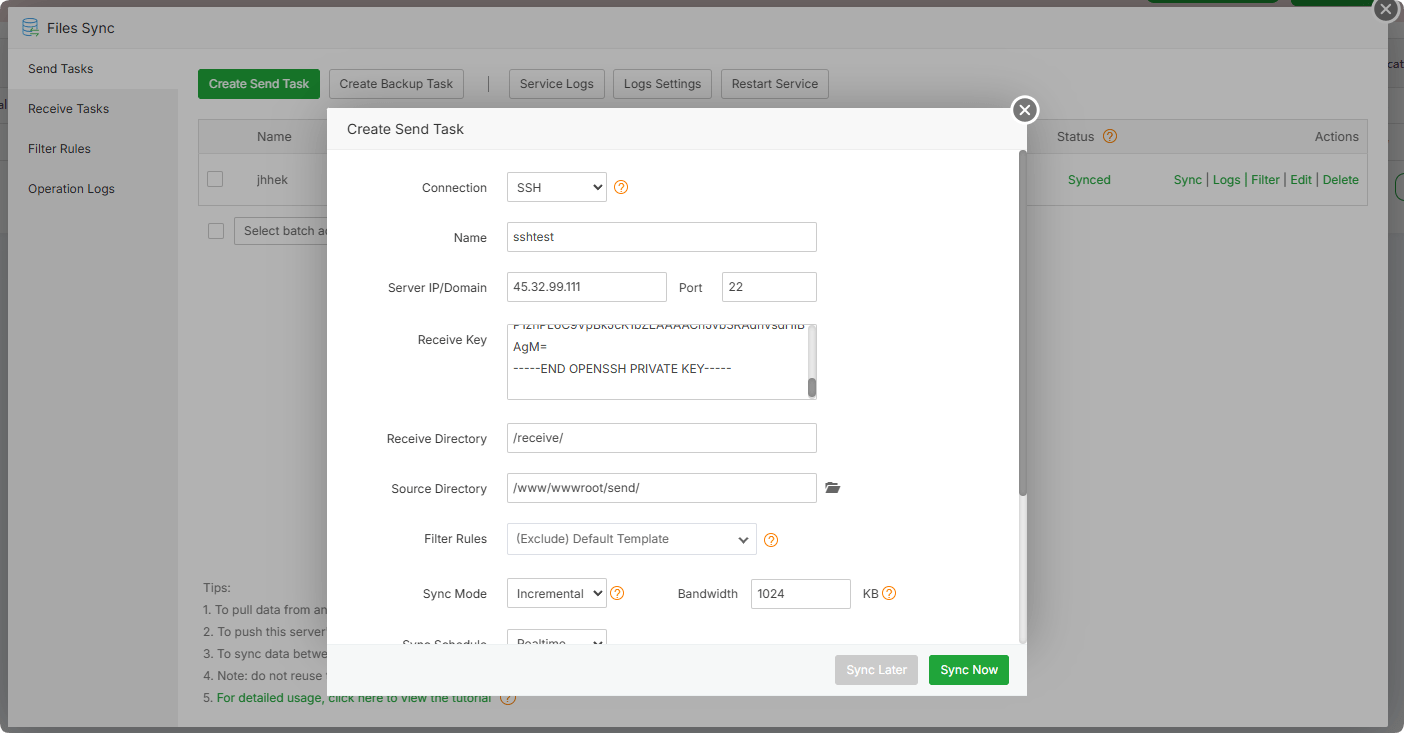
Create a new file in the local source directory to verify it syncs to the target directory
Notes:
- SSH mode does not require creating a receive task on the target server, nor opening port 873; the target just needs SSH (port 22 by default) reachable and the key able to log in
- If sync fails, first check whether the target's SSH port is allowed and whether key-based login is configured
10. Notes & FAQ
1. Port not opened
If the sender cannot connect, first confirm the receiver's port (873 by default) is allowed in the firewall/security group. After changing the port, open the new port again.
2. Cannot sync MySQL data directories
Using a MySQL data directory as the sync / receive directory is rejected (MySQL data directories cannot be synced via file sync), to avoid database corruption.
3. Target directory may be overwritten / cleared
If the receive directory already contains files, an Overwrite risk warning appears when creating; the target directory of a local backup task is cleared. Back up first or choose an empty directory.
4. Unique names
Do not reuse the same sync name or receive username across multiple servers / tasks, or data may get crossed.
5. Trailing slash semantics
Whether the sync path ends with / determines whether data syncs into the directory itself or into a subdirectory under it.
6. Sync issues
When a task status shows
Sync error, click it to view error detailsIf there are many files or the network is unstable, the first sync may be slow; this is normal
Enable Resume to reduce the impact of interruptions